
Hướng Dẫn Cấu Hình PostgreSQL High Availability (HA) Với Patroni, etcd và HAProxy
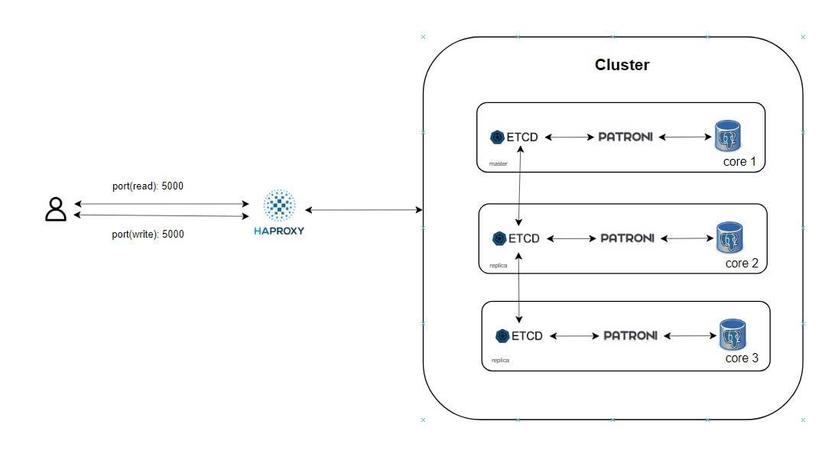
Bài viết này hướng dẫn chi tiết cách thiết lập một cụm PostgreSQL High Availability (HA) sử dụng PostgreSQL 17, Patroni để quản lý cụm, etcd để lưu trữ trạng thái, và HAProxy để cân bằng tải. Cụm bao gồm ba máy chủ: một máy chủ chính (leader) và hai máy chủ phụ (replica). Các bước bao gồm cấu hình mạng, cài đặt phần mềm, thiết lập etcd, Patroni, và HAProxy, cùng với kiểm tra kết quả.
Khái niệm
Patroni - template để cấu hình cụm PostgreSQL.
Etcd - kho lưu trữ cấu hình phân tán, trạng thái của cụm PostgreSQL.
HAProxy - cân bằng tải cho cụm và điểm xử lí tín hiệu đọc ghi trên Database vào Cluster.
PgBackRest - giải pháp sao lưu và khôi phục cho PostgreSQL.
Percona Monitoring - theo dõi tình trạng cụm của bạn
Thông tin hệ thống
- Hệ điều hành: Ubuntu 22.04
- Máy chủ:
server-1: 192.168.65.11 (Leader)server-2: 192.168.65.12 (Replica)server-3: 192.168.65.13 (Replica)
- Cấu hình:
- PostgreSQL 17 (Percona distribution)
- Patroni để quản lý cụm HA
- etcd để lưu trạng thái cụm
- HAProxy để cân bằng tải (port 5000 cho primary, 5001 cho replica)
Bước 1: Cấu hình SSH và mạng
1.1. Cấu hình IP tĩnh
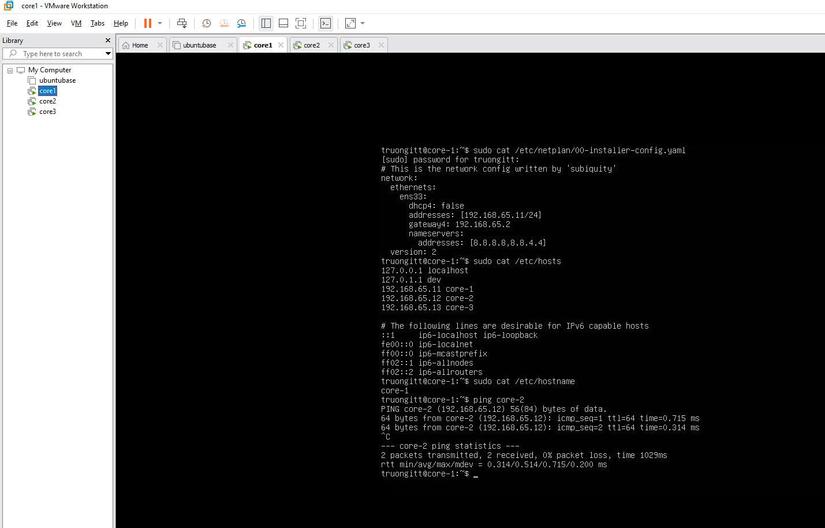
Cấu hình địa chỉ IP tĩnh cho từng máy chủ bằng cách chỉnh sửa file cấu hình mạng /etc/netplan/....
Trên mỗi máy chủ, chỉnh sửa file Netplan:
sudo vi /etc/netplan/01-netcfg.yaml
Nội dung file Netplan:
network:
  ethernets:
    ens33:
      dhcp4: false
      addresses:
        - 192.168.65.11/24  # server-1
        # server-2: 192.168.65.12/24
        # server-3: 192.168.65.13/24
      gateway4: 192.168.65.2
      nameservers:
        addresses: [8.8.8.8, 8.8.4.4]
  version: 2
Áp dụng cấu hình:
sudo netplan apply
1.2. Cấu hình SSH
Cho phép đăng nhập root qua SSH để dễ dàng quản lý.
Chỉnh sửa file SSH:
sudo vi /etc/ssh/sshd_config
Sửa dòng:
PermitRootLogin yes
Khởi động lại dịch vụ SSH:
sudo systemctl restart ssh
sudo systemctl restart sshd
Đặt mật khẩu cho root:
sudo passwd
1.3. Cấu hình hostname và hosts
Thêm thông tin vào file /etc/hosts:
sudo vi /etc/hosts
Nội dung:
192.168.65.11 server-1
192.168.65.12 server-2
192.168.65.13 server-3
Cấu hình hostname trên từng máy chủ:
sudo vi /etc/hostname
- server-1:
server-1 - server-2:
server-2 - server-3:
server-3
Khởi động lại để áp dụng hostname:
sudo reboot
Bước 2: Cài đặt PostgreSQL và các gói liên quan
Thực hiện trên cả ba máy chủ để cài đặt PostgreSQL 17, Patroni, etcd, và các công cụ liên quan.
2.1. Cài đặt các gói
sudo apt update
sudo apt install curl
sudo apt install jq
curl -O https://repo.percona.com/apt/percona-release_latest.generic_all.deb
sudo apt install gnupg2 lsb-release ./percona-release_latest.generic_all.deb
sudo apt update
sudo percona-release setup ppg17
sudo apt install percona-postgresql-17
sudo apt install python3-pip python3-dev binutils
sudo apt install percona-patroni etcd etcd-server etcd-client percona-pgbackrest
2.2. Tắt các dịch vụ tạm thời
sudo systemctl stop etcd patroni postgresql
sudo systemctl disable etcd patroni postgresql
2.3. Cấu hình thư mục và quyền
Tạo thư mục cho mật khẩu:
sudo mkdir /opt/secretpg
sudo chown -R postgres:postgres /opt/secretpg
sudo chmod -R 700 /opt/secretpg
Tạo thư mục dữ liệu PostgreSQL:
sudo mkdir -p /var/run/postgresql/
sudo chown -R postgres:postgres /var/run/postgresql/
sudo chmod 2775 /var/run/postgresql/
2.4. Thiết lập biến môi trường cho Patroni
export NODE_NAME=$(hostname -f)
export NODE_IP=$(hostname -i | awk '{print $1}')
export DATA_DIR="/var/lib/postgresql/17/main"
export PG_BIN_DIR="/usr/lib/postgresql/17/bin"
export NAMESPACE="percona_lab_truongitt"
export SCOPE="clusterdevops_truongitt"
Bước 3: Cấu hình etcd
Cấu hình etcd để quản lý trạng thái cụm PostgreSQL. Bắt đầu từ server-1, sau đó thêm server-2 và server-3.
3.1. Cấu hình etcd trên server-1
Chỉnh sửa file /etc/etcd/etcd.conf.yaml:
sudo vi /etc/etcd/etcd.conf.yaml
Nội dung:
name: server-1
initial-cluster-token: pgcluster_truongitt
initial-cluster-state: new
initial-cluster: server-1=http://192.168.65.11:2380
data-dir: /var/lib/etcd
initial-advertise-peer-urls: http://192.168.65.11:2380
listen-peer-urls: http://192.168.65.11:2380
advertise-client-urls: http://192.168.65.11:2379
listen-client-urls: http://192.168.65.11:2379
3.2. Cấu hình etcd trên server-2
sudo vi /etc/etcd/etcd.conf.yaml
Nội dung:
name: server-2
initial-cluster-token: pgcluster_truongitt
initial-cluster-state: existing
initial-cluster: server-1=http://192.168.65.11:2380,server-2=http://192.168.65.12:2380
data-dir: /var/lib/etcd
initial-advertise-peer-urls: http://192.168.65.12:2380
listen-peer-urls: http://192.168.65.12:2380
advertise-client-urls: http://192.168.65.12:2379
listen-client-urls: http://192.168.65.12:2379,http://127.0.0.1:2379
3.3. Cấu hình etcd trên server-3
sudo vi /etc/etcd/etcd.conf.yaml
Nội dung:
name: server-3
initial-cluster-token: pgcluster_truongitt
initial-cluster-state: existing
initial-cluster: server-1=http://192.168.65.11:2380,server-2=http://192.168.65.12:2380,server-3=http://192.168.65.13:2380
data-dir: /var/lib/etcd
initial-advertise-peer-urls: http://192.168.65.13:2380
listen-peer-urls: http://192.168.65.13:2380
advertise-client-urls: http://192.168.65.13:2379
listen-client-urls: http://192.168.65.13:2379,http://127.0.0.1:2379
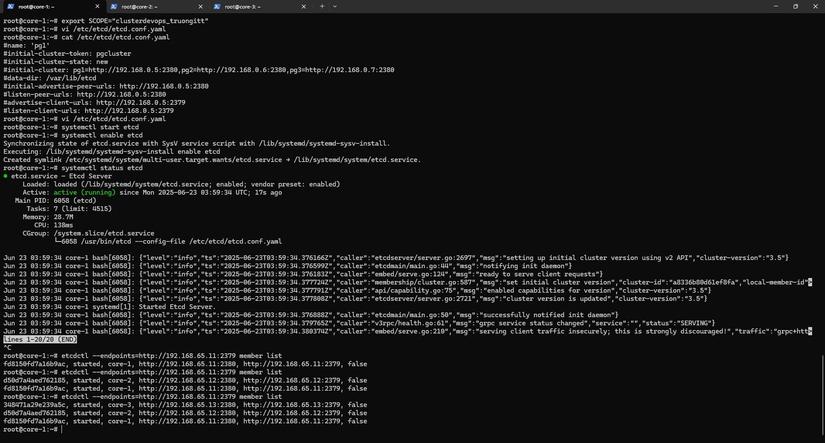
3.4. Kích hoạt và kiểm tra etcd
Trên server-1:
sudo systemctl start etcd
sudo systemctl enable etcd
etcdctl --endpoints=http://192.168.65.11:2379 member list
Thêm server-2:
etcdctl --endpoints=http://192.168.65.11:2379 member add server-2 --peer-urls=http://192.168.65.12:2380
sudo systemctl start etcd
sudo systemctl enable etcd
Thêm server-3:
etcdctl --endpoints=http://192.168.65.11:2379 member add server-3 --peer-urls=http://192.168.65.13:2380
sudo systemctl start etcd
sudo systemctl enable etcd
Kiểm tra cụm etcd:
etcdctl --endpoints=http://192.168.65.11:2379 member list
Kết quả mong đợi:
52f270512d6f415, started, server-2, http://192.168.65.12:2380, http://192.168.65.12:2379, false
8940bcc160088537, started, server-3, http://192.168.65.13:2380, http://192.168.65.13:2379, false
fd8150fd7a16b9ac, started, server-1, http://192.168.65.11:2380, http://192.168.65.11:2379, false
Bước 4: Cấu hình Patroni
Cấu hình Patroni trên cả ba máy chủ để quản lý cụm PostgreSQL HA.
4.1. Cấu hình Patroni trên server-1
Chỉnh sửa file /etc/patroni/patroni.yml:
sudo vi /etc/patroni/patroni.yml
Nội dung:
namespace: percona_lab_truongitt scope: clusterdevops_truongitt name: core-1 restapi: listen: 0.0.0.0:8008 connect_address: 192.168.65.11:8008 etcd3: host: 192.168.65.11:2379 bootstrap: dcs: ttl: 30 loop_wait: 10 retry_timeout: 10 maximum_lag_on_failover: 1048576 postgresql: use_pg_rewind: true use_slots: true parameters: wal_level: replica hot_standby: on wal_keep_segments: 10 max_wal_senders: 5 max_replication_slots: 10 wal_log_hints: on logging_collector: 'on' max_wal_size: '10GB' archive_mode: on archive_timeout: 600s archive_command: cp -f %p /home/postgres/archived/%f timezone: 'Asia/Ho_Chi_Minh' work_mem: 4MB pg_hba: - local all all peer - host replication replicator 127.0.0.1/32 trust - host replication replicator 192.0.0.0/8 scram-sha-256 - host all all 0.0.0.0/0 scram-sha-256 recovery_conf: restore_command: cp /home/postgres/archived/%f %p initdb: - encoding: UTF8 - data-checksums postgresql: cluster_name: cluster_1 listen: 0.0.0.0:5432 connect_address: 192.168.65.11:5432 data_dir: /var/lib/postgresql/17/main bin_dir: /usr/lib/postgresql/17/bin pgpass: /opt/secretpg/pgpass authentication: replication: username: replicator password: replPasswd superuser: username: postgres password: truongitt123 parameters: unix_socket_directories: /var/run/postgresql/ create_replica_methods: - basebackup basebackup: checkpoint: 'fast' pg_hba: - local all all peer - host replication replicator 127.0.0.1/32 trust - host replication replicator 192.0.0.0/8 scram-sha-256 - host all all 0.0.0.0/0 scram-sha-256 watchdog: mode: off tags: nofailover: false noloadbalance: false clonefrom: false nosync: false
4.2. Cấu hình Patroni trên server-2 và server-3
Trên server-2:
namespace: percona_lab_truongitt scope: clusterdevops_truongitt name: core-2 restapi: listen: 0.0.0.0:8008 connect_address: 192.168.65.12:8008 etcd3: host: 192.168.65.11:2379 bootstrap: dcs: ttl: 30 loop_wait: 10 retry_timeout: 10 maximum_lag_on_failover: 1048576 postgresql: use_pg_rewind: true use_slots: true parameters: wal_level: replica hot_standby: on wal_keep_segments: 10 max_wal_senders: 5 max_replication_slots: 10 wal_log_hints: on logging_collector: 'on' max_wal_size: '10GB' archive_mode: on archive_timeout: 600s archive_command: cp -f %p /home/postgres/archived/%f timezone: 'Asia/Ho_Chi_Minh' work_mem: 4MB pg_hba: - local all all peer - host replication replicator 127.0.0.1/32 trust - host replication replicator 192.0.0.0/8 scram-sha-256 - host all all 0.0.0.0/0 scram-sha-256 recovery_conf: restore_command: cp /home/postgres/archived/%f %p initdb: - encoding: UTF8 - data-checksums postgresql: cluster_name: cluster_1 listen: 0.0.0.0:5432 connect_address: 192.168.65.12:5432 data_dir: /var/lib/postgresql/17/main bin_dir: /usr/lib/postgresql/17/bin pgpass: /opt/secretpg/pgpass authentication: replication: username: replicator password: replPasswd superuser: username: postgres password: truongitt123 parameters: unix_socket_directories: /var/run/postgresql/ create_replica_methods: - basebackup basebackup: checkpoint: 'fast' pg_hba: - local all all peer - host replication replicator 127.0.0.1/32 trust - host replication replicator 192.0.0.0/8 scram-sha-256 - host all all 0.0.0.0/0 scram-sha-256 watchdog: mode: off tags: nofailover: false noloadbalance: false clonefrom: false nosync: false
Trên server-3:
namespace: percona_lab_truongitt scope: clusterdevops_truongitt name: server-3 restapi: listen: 0.0.0.0:8008 connect_address: 192.168.65.13:8008 etcd3: host: 192.168.65.11:2379 bootstrap: dcs: ttl: 30 loop_wait: 10 retry_timeout: 10 maximum_lag_on_failover: 1048576 postgresql: use_pg_rewind: true use_slots: true parameters: wal_level: replica hot_standby: on wal_keep_segments: 10 max_wal_senders: 5 max_replication_slots: 10 wal_log_hints: on logging_collector: 'on' max_wal_size: '10GB' archive_mode: on archive_timeout: 600s archive_command: cp -f %p /home/postgres/archived/%f timezone: 'Asia/Ho_Chi_Minh' work_mem: 4MB pg_hba: - local all all peer - host replication replicator 127.0.0.1/32 trust - host replication replicator 192.0.0.0/8 scram-sha-256 - host all all 0.0.0.0/0 scram-sha-256 recovery_conf: restore_command: cp /home/postgres/archived/%f %p initdb: - encoding: UTF8 - data-checksums postgresql: cluster_name: cluster_1 listen: 0.0.0.0:5432 connect_address: 192.168.65.13:5432 data_dir: /var/lib/postgresql/17/main bin_dir: /usr/lib/postgresql/17/bin pgpass: /opt/secretpg/pgpass authentication: replication: username: replicator password: replPasswd superuser: username: postgres password: truongitt123 parameters: unix_socket_directories: /var/run/postgresql/ create_replica_methods: - basebackup basebackup: checkpoint: 'fast' pg_hba: - local all all peer - host replication replicator 127.0.0.1/32 trust - host replication replicator 192.0.0.0/8 scram-sha-256 - host all all 0.0.0.0/0 scram-sha-256 watchdog: mode: off tags: nofailover: false noloadbalance: false clonefrom: false nosync: false
4.3. Kích hoạt Patroni
Trên mỗi máy chủ, bắt đầu từ server-1, sau đó server-2 và server-3:
sudo systemctl daemon-reload
sudo systemctl start patroni
sudo systemctl status patroni
4.4. Kiểm tra cụm Patroni
Kiểm tra file pg_hba.conf:
sudo cat /var/lib/postgresql/17/main/pg_hba.conf
Kiểm tra lỗi trong file YAML:
sudo nano -ET4 /etc/patroni/patroni.yml
Kiểm tra trạng thái cụm:
patronictl -c /etc/patroni/patroni.yml list $SCOPE
Kết quả mong đợi:
+ Cluster: clusterdevops_truongitt (7517526875326604092) ---------+
| Member   | Host          | Role    | State     | TL | Lag in MB |
+----------+---------------+---------+-----------+----+-----------+
| server-1 | 192.168.65.11 | Leader  | running   |  3 |           |
| server-2 | 192.168.65.12 | Replica | streaming |  3 |         0 |
| server-3 | 192.168.65.13 | Replica | streaming |  3 |         0 |
+----------+---------------+---------+-----------+----+-----------+
Bước 5: Cấu hình HAProxy
Cài đặt và cấu hình HAProxy để cân bằng tải cho primary (port 5000) và replica (port 5001).
5.1. Cài đặt HAProxy
sudo apt install -y haproxy
sudo mv /etc/haproxy/haproxy.cfg /etc/haproxy/haproxy.cfg.org
sudo vi /etc/haproxy/haproxy.cfg
Nội dung file /etc/haproxy/haproxy.cfg:
global
    maxconn 100

defaults
    log global
    mode tcp
    retries 2
    timeout client 30m
    timeout connect 4s
    timeout server 30m
    timeout check 5s

listen stats
    mode http
    bind *:7000
    stats enable
    stats uri /

listen primary
    bind *:5000
    option httpchk /primary
    http-check expect status 200
    default-server inter 3s fall 3 rise 2 on-marked-down shutdown-sessions
    server core-1 192.168.65.11:5432 maxconn 100 check port 8008
    server core-2 192.168.65.12:5432 maxconn 100 check port 8008
    server core-3 192.168.65.13:5432 maxconn 100 check port 8008

listen standbys
    balance roundrobin
    bind *:5001
    option httpchk /replica
    http-check expect status 200
    default-server inter 3s fall 3 rise 2 on-marked-down shutdown-sessions
    server core-1 192.168.65.11:5432 maxconn 100 check port 8008
    server core-2 192.168.65.12:5432 maxconn 100 check port 8008
    server core-3 192.168.65.13:5432 maxconn 100 check port 8008
5.2. Khởi động lại HAProxy
sudo systemctl restart haproxy
Bước 6: Kiểm tra kết quả
Kiểm tra kết nối và hoạt động của cụm PostgreSQL qua HAProxy.
6.1. Kiểm tra trên server-1 (primary)
curl -s localhost:8008/primary | jq
sudo -u postgres psql
select * from pg_replication_slots;
or
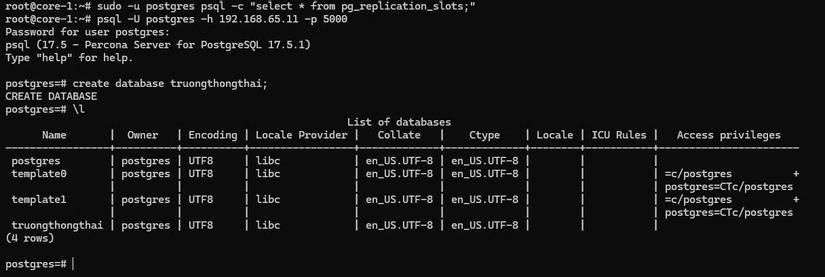
sudo -u postgres psql -c "select * from pg_replication_slots;"


Kết nối và tạo database:
psql -U postgres -h 192.168.65.11 -p 5000
Nhập mật khẩu:
postgresTạo database:
create database vietdba;
\l
Kết quả: Database được tạo thành công trên primary.
6.2. Kiểm tra trên server-2 và server-3 (replica)
sudo -u postgres psql
SELECT * FROM pg_stat_wal_receiver;
Thử tạo database trên replica:
psql -U postgres -h 192.168.65.11 -p 5001create database vietdba;
Kết quả mong đợi:
ERROR: cannot execute CREATE DATABASE in a read-only transaction

Điều này xác nhận replica chỉ cho phép đọc, không cho phép ghi.
Hoàn thành
Chúc mừng bạn đã hoàn thành thiết lập cụm PostgreSQL HA với Patroni, etcd và HAProxy. Cụm này đảm bảo tính sẵn sàng cao với một primary server (server-1) và hai replica server (server-2, server-3) hiệu quả trong việc điều phối giảm tải và sự cố hạ tầng.
Website không chứa bất kỳ quảng cáo nào, mọi đóng góp để duy trì phát triển cho website (donation) xin vui lòng gửi về STK 90.2142.8888 - Ngân hàng Vietcombank Thăng Long - TRAN VAN BINH
=============================
Nếu bạn không muốn bị AI thay thế và tiết kiệm 3-5 NĂM trên con đường trở thành DBA chuyên nghiệp hay làm chủ Database thì hãy đăng ký ngay KHOÁ HỌC ORACLE DATABASE A-Z ENTERPRISE, được Coaching trực tiếp từ tôi với toàn bộ bí kíp thực chiến, thủ tục, quy trình của gần 20 năm kinh nghiệm (mà bạn sẽ KHÔNG THỂ tìm kiếm trên Internet/Google) từ đó giúp bạn dễ dàng quản trị mọi hệ thống Core tại Việt Nam và trên thế giới, đỗ OCP.
- CÁCH ĐĂNG KÝ: Gõ (.) hoặc để lại số điện thoại hoặc inbox https://m.me/tranvanbinh.vn hoặc Hotline/Zalo 090.29.12.888
- Chi tiết tham khảo:
https://bit.ly/oaz_w
=============================
2 khóa học online qua video giúp bạn nhanh chóng có những kiến thức nền tảng về Linux, Oracle, học mọi nơi, chỉ cần có Internet/4G:
- Oracle cơ bản: https://bit.ly/admin_1200
- Linux: https://bit.ly/linux_1200
=============================
KẾT NỐI VỚI CHUYÊN GIA TRẦN VĂN BÌNH:
📧 Mail: binhoracle@gmail.com
☎️ Mobile/Zalo: 0902912888
👨 Facebook: https://www.facebook.com/BinhOracleMaster
👨 Inbox Messenger: https://m.me/101036604657441 (profile)
👨 Fanpage: https://www.facebook.com/tranvanbinh.vn
👨 Inbox Fanpage: https://m.me/tranvanbinh.vn
👨👩 Group FB: https://www.facebook.com/groups/DBAVietNam
👨 Website: https://www.tranvanbinh.vn
👨 Blogger: https://tranvanbinhmaster.blogspot.com
🎬 Youtube: https://www.youtube.com/@binhguru
👨 Tiktok: https://www.tiktok.com/@binhguru
👨 Linkin: https://www.linkedin.com/in/binhoracle
👨 Twitter: https://twitter.com/binhguru
👨 Podcast: https://www.podbean.com/pu/pbblog-eskre-5f82d6
👨 Địa chỉ: Tòa nhà Sun Square - 21 Lê Đức Thọ - Phường Mỹ Đình 1 - Quận Nam Từ Liêm - TP.Hà Nội
=============================
Cấu hình Postgresql High Availability on premises với Patroni, etcd và HAProxy full setup, AI, trí tuệ nhân tạo, artificial intelligence, machine learning, deep learning, LLM, ChatGPT, DeepSeek, Grok, oracle tutorial, học oracle database, Tự học Oracle, Tài liệu Oracle 12c tiếng Việt, Hướng dẫn sử dụng Oracle Database, Oracle SQL cơ bản, Oracle SQL là gì, Khóa học Oracle Hà Nội, Học chứng chỉ Oracle ở đầu, Khóa học Oracle online,sql tutorial, khóa học pl/sql tutorial, học dba, học dba ở việt nam, khóa học dba, khóa học dba sql, tài liệu học dba oracle, Khóa học Oracle online, học oracle sql, học oracle ở đâu tphcm, học oracle bắt đầu từ đâu, học oracle ở hà nội, oracle database tutorial, oracle database 12c, oracle database là gì, oracle database 11g, oracle download, oracle database 19c, oracle dba tutorial, oracle tunning, sql tunning , oracle 12c, oracle multitenant, Container Databases (CDB), Pluggable Databases (PDB), oracle cloud, oracle security, oracle fga, audit_trail,oracle RAC, ASM, oracle dataguard, oracle goldengate, mview, oracle exadata, oracle oca, oracle ocp, oracle ocm , oracle weblogic, postgresql tutorial, mysql tutorial, mariadb tutorial, ms sql server tutorial, nosql, mongodb tutorial, oci, cloud, middleware tutorial, hoc solaris tutorial, hoc linux tutorial, hoc aix tutorial, unix tutorial, securecrt, xshell, mobaxterm, putty


