
I. Giới thiệu
Webserver cũng tương tự như Apache, tuy nhiên Apache Tomcat là một loại web server HTTP được phát triển bởi Apache Software Foundation.
Các tính năng của Apache Tomcat là hỗ trợ chuyên cho các ứng dụng Java thuần tuý thay vì các website tĩnh.
Tomcat là một vùng chứa Java servlet, triển khai các thông số kỹ thuật cốt lõi của Java, và có khả năng chạy trên nhiều bản Java chuyên biệt như: Java Servlet, JavaServer Pages (JSP) và WebSockets APIs.
Apache Software Foundation, Tomcat được phát hành lần đầu vào năm 1998, chỉ 4 năm sau sự ra đời của Java. Khởi đầu như một triển khai tham chiếu cho Java Servlet API và JSP. Apache Tomcat vẫn là máy chủ Java được sử dụng phổ biến.
II. Các bước thực hiện cài đặt nginx proxyTomcat 10
Bước 1: Update hệ thống và cài đặt epel-release
Bạn hãy chạy các lệnh sau để cập nhật hệ thống và cài đặt gói phầm mềm epel-release.
yum install epel-release -y
yum update -y && reboot
Bước 2: Cài đặt java
Tiếp theo bạn hãy cài đặt ứng dụng java.
yum install java-1.8.0-openjdk-devel
Sau khi cài đặt xong bạn có thể kiểm tra phiên bản java -version bằng lênh sau.
Dùng lệnh
whereis java
để tìm dòng /usr/bin/java

cat >> "/root/.bash_profile" << END
JAVA_HOME=/usr/bin/java
export JAVA_HOME
END

Thực hiện lệnh
source .bash_profile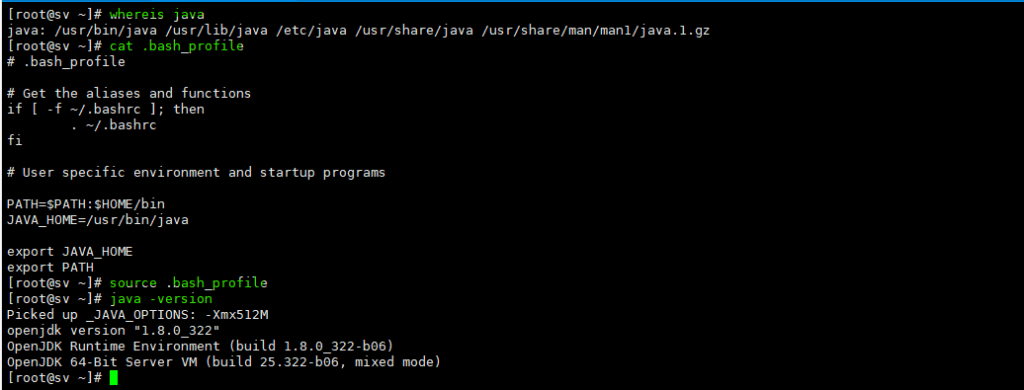
Bước 3 : Tạo user và group thư mục document root
Tiếp tục chúng ta cần tạo User tomcat và group tomcat để hệ thống hoạt động với quyền user: tomcat và mục đích để tăng cường bảo mật.
Tạo User và Group “tomcat”
groupadd tomcat
useradd -s /bin/false -g tomcat -d /usr/local/tomcat tomcat
chmod 755 /usr/local/tomcat
Với lệnh trên thì đã thực hiện tạo user: tomcat và group tomcat với -s /bin/false không cho phép user login.
Bước 5: Cài đặt apache tomcat 10
Bạn có thể truy cập vào trang chủ để tài bản mới nhất ở đây. Thực hiện tải apache tomcat về với lệnh sau
cd /tmp
wget https://dlcdn.apache.org/tomcat/tomcat-10/v10.0.20/bin/apache-tomcat-10.0.20.tar.gz
tar -xzvf apache-tomcat-10.0.20.tar.gz -C /usr/local/tomcat --strip-components=1
Sau đó thực hiện phân quyền lại thư mục này.
cd /usr/local/tomcat
chgrp -R tomcat .
chmod -R g+r conf
chmod g+x conf
chown -R tomcat webapps/ work/ temp/ logs/
chmod +x /usr/local/tomcat/bin*.sh
Tiến hành tạo service tomcat để quản lý hoạt động. Để tìm đương dẫn Environment=JAVA_HOME= thực hiện lênh bên dưới.
alternatives --list | grep ^java
Sau đó tạo file tomcat.service
vi /etc/systemd/system/tomcat.service
Copy nội dung sau dán vào file tomcat.service
# Systemd unit file for tomcat
[Unit]
Description=Apache Tomcat Web Application Container
After=syslog.target network.target

[Service]
Type=forking

Environment=JAVA_HOME=/usr/lib/jvm/java-1.8.0-openjdk-1.8.0.322.b06-1.el7_9.x86_64
Environment=CATALINA_PID=/usr/local/tomcat/temp/tomcat.pid
Environment=CATALINA_HOME=/usr/local/tomcat
Environment=CATALINA_BASE=/usr/local/tomcat
Environment='CATALINA_OPTS=-Xms512M -Xmx1024M -server -XX:+UseParallelGC'
Environment='JAVA_OPTS=-Djava.awt.headless=true -Djava.security.egd=file:/dev/./urandom'

ExecStart=/usr/local/tomcat/bin/startup.sh
ExecStop=/bin/kill -15 $MAINPID

User=tomcat
Group=tomcat
UMask=0007
RestartSec=10
Restart=always

[Install]
WantedBy=multi-user.target
Thực hiện reload lại systemd để nhận file tomcat unit và khởi đông dịch vụ tomcat.
systemctl daemon-reload
systemctl enable tomcat
systemctl start tomcat
systemctl status tomcat
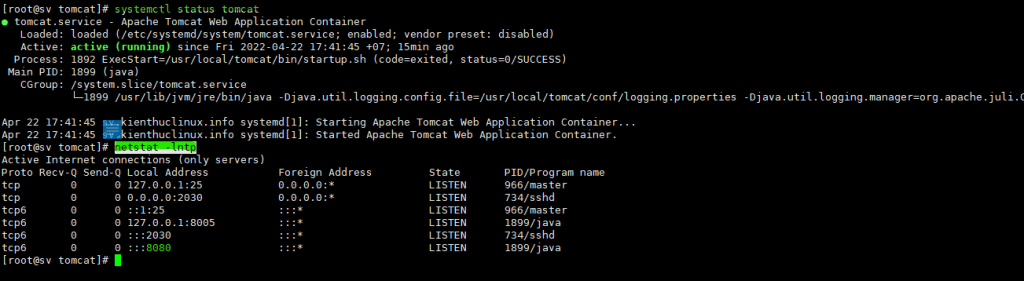
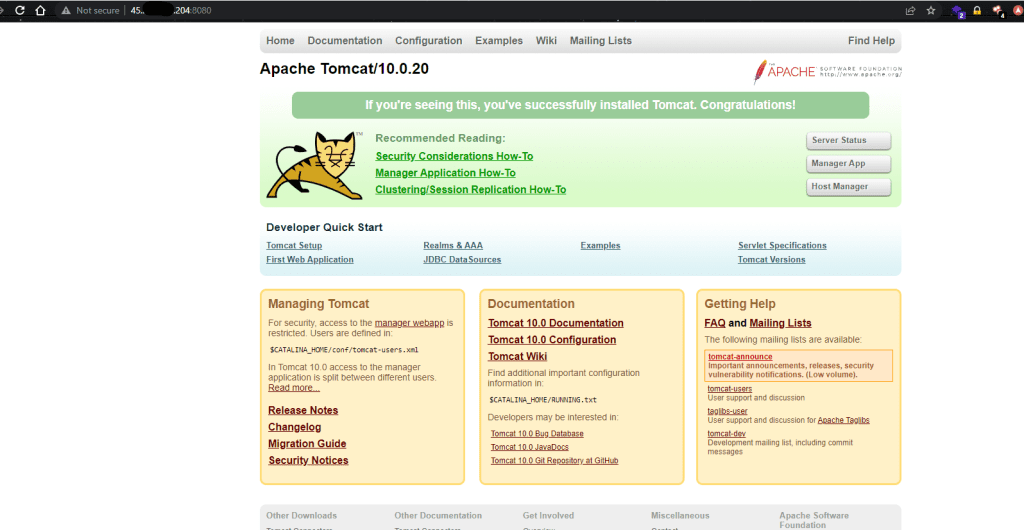
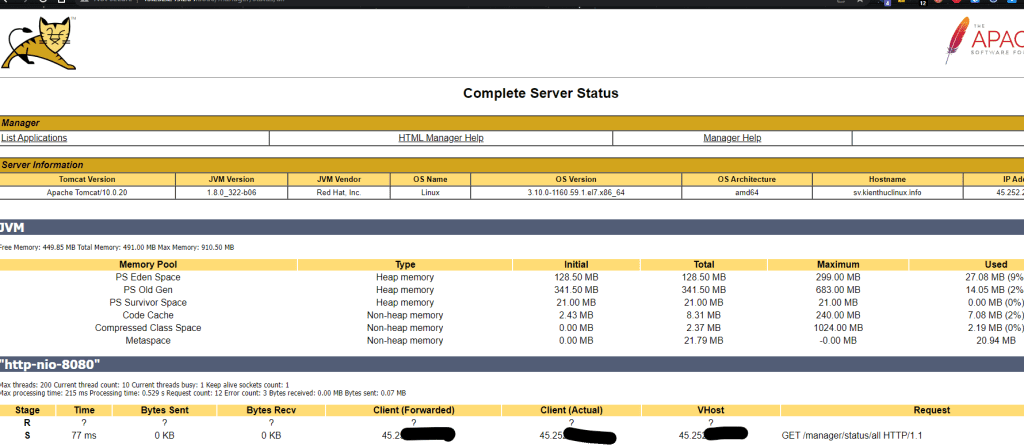
Các bạn kiểm tra status netstat -lntp sẽ thấy port: 8080 mình tiến hành truy cập http://ip-server:8080 kiểm tra
Thiết lập user để truy cập vào quản lý tomcat. Bạn chạy các lệnh sau để thiết lập quyền.
cd /usr/local/tomcat
cp conf/tomcat-users.xml conf/tomcat-users.xml.bak
vi conf/tomcat-users.xml
Sau đó dán nội dung bên dưới vào file tomcat-users.xml
<tomcat-users>
<!--
Comments
-->
<role rolename="admin-gui"/>
<role rolename="manager-gui"/>
<user username="admin" password="RUUsbrCOtenSC" roles="admin-gui,manager-gui"/>
</tomcat-users>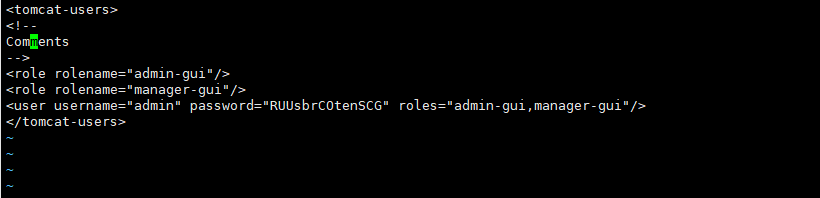
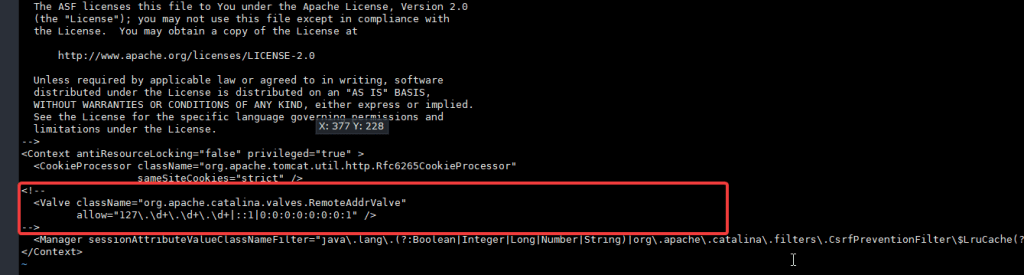
Để truy cập vào apache tomcat cần allow IP. Hiện tại mình comment để tiện settup nhé.
vi webapps/manager/META-INF/context.xml
<!--
  <Valve className="org.apache.catalina.valves.RemoteAddrValve"
         allow="127\.\d+\.\d+\.\d+|::1|0:0:0:0:0:0:0:1" />
-->
Tiến hành restart lại service tomcat.
service nginx restart
Thử truy cập vào với thông tin thiết lập user ở trên để kiểm tra:
III . Thực hiện cài đặt Nginx
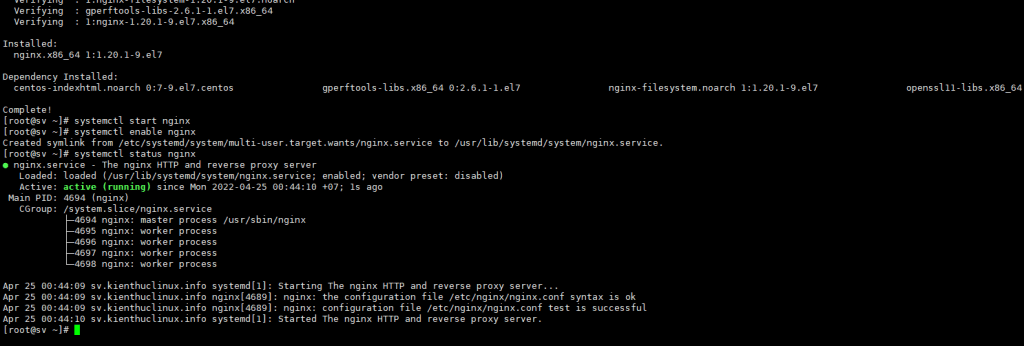
Tiếp theo bạn hãy cài đặt Webserver NGINX bằng lênh sau. Ở đây AZDIGI sử dụng lệnh yum để cài đặt một cách nhanh chóng.
yum install nginx -y
systemctl start nginx
systemctl enable nginx
systemctl status nginx
Sau khi cài xong NGINX chạy các lệnh bên dưới để khởi động, kích hoạt dịch vụ
systemctl start nginx
systemctl enable nginx
systemctl status nginx
Tạo file vhost để thực hiện nginx proxy tomcat
cd /etc/nginx/conf.d
vi kienthuclinux.info.conf
Sau đó dán nội dung bên dưới vào file kienthuclinux.info.conf. Và lưu ý hãy thay kienthuclinux.info.conf thành tên miền của bạn.
server {
  listen          80;
  server_name     kienthuclinux.info;
  root            /usr/local/tomcat/webapps/;
  underscores_in_headers on;

  location / {
        proxy_pass  http://ip:8080/;
        proxy_set_header   X-Real-IP        $remote_addr;
        proxy_set_header   X-Forwarded-For  $proxy_add_x_forwarded_for;
        proxy_set_header   X-NginX-Proxy    true;
        proxy_set_header   X-Forwarded-Proto $scheme;
        proxy_set_header   Host             $http_host;
        proxy_set_header   Upgrade          $http_upgrade;
        proxy_redirect     off;
        proxy_http_version 1.1;
        proxy_set_header   Connection "upgrade";
  }
}
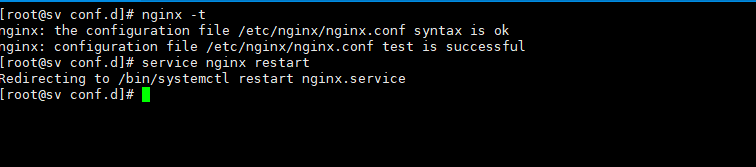
Thực hiện kiểm tra nginx và resart lại nginx. Ở hình bên dưới không có lỗi.
nginx -t
service nginx restart
IV. Kiểm tra đã truy cập bằng domain
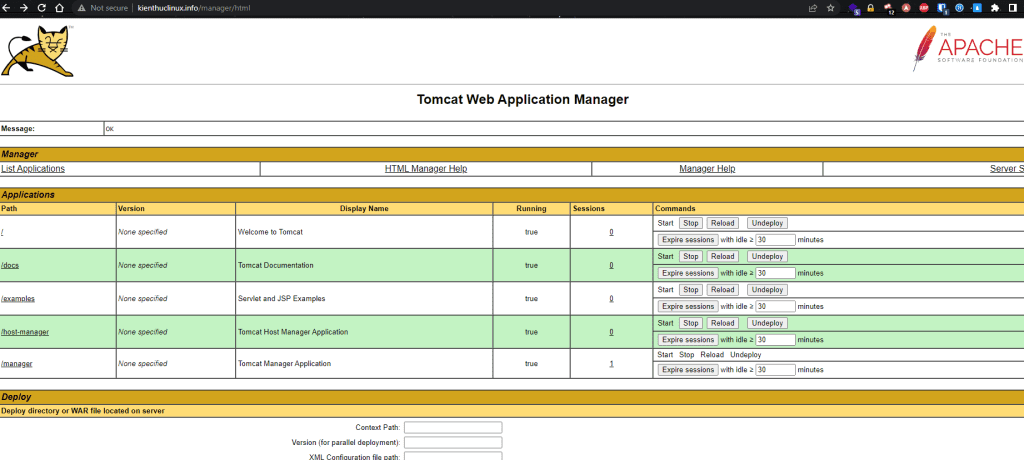
Bạn truy cập vào tên miền để kiểm tra. Nếu xuất hiện như ảnh đính kèm thì đã hoàn tất các bước cài đặt thiết lập.
Chúc bạn thực hiện thành công.
Website không chứa bất kỳ quảng cáo nào, mọi đóng góp để duy trì phát triển cho website (donation) xin vui lòng gửi về STK 90.2142.8888 - Ngân hàng Vietcombank Thăng Long - TRAN VAN BINH
=============================
Nếu bạn không muốn bị AI thay thế và tiết kiệm 3-5 NĂM trên con đường trở thành DBA chuyên nghiệp hay làm chủ Database thì hãy đăng ký ngay KHOÁ HỌC ORACLE DATABASE A-Z ENTERPRISE, được Coaching trực tiếp từ tôi với toàn bộ bí kíp thực chiến, thủ tục, quy trình của gần 20 năm kinh nghiệm (mà bạn sẽ KHÔNG THỂ tìm kiếm trên Internet/Google) từ đó giúp bạn dễ dàng quản trị mọi hệ thống Core tại Việt Nam và trên thế giới, đỗ OCP.
- CÁCH ĐĂNG KÝ: Gõ (.) hoặc để lại số điện thoại hoặc inbox https://m.me/tranvanbinh.vn hoặc Hotline/Zalo 090.29.12.888
- Chi tiết tham khảo:
https://bit.ly/oaz_w
=============================
2 khóa học online qua video giúp bạn nhanh chóng có những kiến thức nền tảng về Linux, Oracle, học mọi nơi, chỉ cần có Internet/4G:
- Oracle cơ bản: https://bit.ly/admin_1200
- Linux: https://bit.ly/linux_1200
=============================
KẾT NỐI VỚI CHUYÊN GIA TRẦN VĂN BÌNH:
📧 Mail: binhoracle@gmail.com
☎️ Mobile/Zalo: 0902912888
👨 Facebook: https://www.facebook.com/BinhOracleMaster
👨 Inbox Messenger: https://m.me/101036604657441 (profile)
👨 Fanpage: https://www.facebook.com/tranvanbinh.vn
👨 Inbox Fanpage: https://m.me/tranvanbinh.vn
👨👩 Group FB: https://www.facebook.com/groups/DBAVietNam
👨 Website: https://www.tranvanbinh.vn
👨 Blogger: https://tranvanbinhmaster.blogspot.com
🎬 Youtube: https://www.youtube.com/@binhguru
👨 Tiktok: https://www.tiktok.com/@binhguru
👨 Linkin: https://www.linkedin.com/in/binhoracle
👨 Twitter: https://twitter.com/binhguru
👨 Podcast: https://www.podbean.com/pu/pbblog-eskre-5f82d6
👨 Địa chỉ: Tòa nhà Sun Square - 21 Lê Đức Thọ - Phường Mỹ Đình 1 - Quận Nam Từ Liêm - TP.Hà Nội
=============================
cở sở dữ liệu, cơ sở dữ liệu quốc gia, database, AI, trí tuệ nhân tạo, artificial intelligence, machine learning, deep learning, LLM, ChatGPT, DeepSeek, Grok, oracle tutorial, học oracle database, Tự học Oracle, Tài liệu Oracle 12c tiếng Việt, Hướng dẫn sử dụng Oracle Database, Oracle SQL cơ bản, Oracle SQL là gì, Khóa học Oracle Hà Nội, Học chứng chỉ Oracle ở đầu, Khóa học Oracle online,sql tutorial, khóa học pl/sql tutorial, học dba, học dba ở việt nam, khóa học dba, khóa học dba sql, tài liệu học dba oracle, Khóa học Oracle online, học oracle sql, học oracle ở đâu tphcm, học oracle bắt đầu từ đâu, học oracle ở hà nội, oracle database tutorial, oracle database 12c, oracle database là gì, oracle database 11g, oracle download, oracle database 19c, oracle dba tutorial, oracle tunning, sql tunning , oracle 12c, oracle multitenant, Container Databases (CDB), Pluggable Databases (PDB), oracle cloud, oracle security, oracle fga, audit_trail,oracle RAC, ASM, oracle dataguard, oracle goldengate, mview, oracle exadata, oracle oca, oracle ocp, oracle ocm , oracle weblogic, postgresql tutorial, mysql tutorial, mariadb tutorial, ms sql server tutorial, nosql, mongodb tutorial, oci, cloud, middleware tutorial, hoc solaris tutorial, hoc linux tutorial, hoc aix tutorial, unix tutorial, securecrt, xshell, mobaxterm, putty


