
MÔ TẢ: Trong bài viết này chúng ta sẽ thực hiện cài đặt step by step Oracle Rac 19c trên OEL 7.3 (có thể phiên bản 7.9 hoặc 8)
Mục lục:
Cài đặt Oracle virtual box
Cài đặt OEL 7.3
Cấu hình DNS
Copy Virtual Box
Tạo Shared Disk
Cấu hình Oracle ASM
Pre-check cho cài đặt RAC
Cài đặt và cấu hình Oracle Grid Infrastructure cho 1 Cluster
Cài đặt Oracle 19c Database
Kiểm tra lại (Post-Check) sau khi cài đặt
GIỚI THIỆU
Một trong những trở ngại lớn nhất ngăn cản mọi người thiết lập môi trường RAC thử nghiệm là yêu cầu về phân vùng lưu trữ phải được chia sẻ bởi các node trong RAC. Trong môi trường thực tế, lưu trữ chia sẻ thường được cung cấp bởi SAN hoặc thiết bị NAS cao cấp, nhưng cả hai tùy chọn này đều rất tốn kém đôi lúc nó bất khả thi với những người học sinh, sinh viên muốn làm LAB. Một giải pháp thay thế rẻ hơn là sử dụng FireWire để cho phép hai máy truy cập vào (các) đĩa giống nhau, nhưng điều đó vẫn tốn tiền và yêu cầu có hai máy chủ. Tùy chọn thứ ba là sử dụng ảo hóa để giả lập vùng đĩa chia sẻ.
Sử dụng VirtualBox, bạn có thể chạy nhiều Máy ảo (VM) trên một máy chủ duy nhất, cho phép bạn chạy cả hai nút RAC trên một máy duy nhất. Ngoài ra, nó cho phép bạn thiết lập các đĩa ảo dùng chung, vượt qua trở ngại về dung lượng lưu trữ dùng chung đắt tiền.

Mô hình kết nối chuẩn, dự phòng:
Tải phần mềm
Tải các phần mềm dưới đây:
– Oracle Database 19c Release 3 – Linux x86-64
Chuẩn bị OS cho mỗi node: :
Total : 100GB
SWAP : 16 GB
/tmp : 10 GB
/boot : 2 GB
/ : 20 GB
/u01 : 50 GB
(DB Production thì OS Total / nên xin từ 100-200GB, mount point /u01 cũng nên xin từ 200-300GB)
Ngoài ra: RAM tối thiểu 6GB, theo khuyến nghị từ 8GB
1. Cài đặt Oracle VirtualBox
Tải và cài đặt VirtualBox-6.1.0-135406-Win
Tạo Virtual machine mới cho Node1.
Click vào nút New… và Click Next

Đưa tên là dbwr1, type là Linux và phiên bản là Oracle 64bit. Click Next

Cấu hình Memory size là 12GB và click vào nút Next
Chú ý: Oracle khuyến nghị ít nhất RAM là 8GB RAM mỗi node khi cài đặt Oracle Grid Infrastructure.
Trong môi trường Production nếu không đủ RAM, bạn sẽ thấy gặp hiện tượng loại bỏ node và khởi động lại node có thể thi thoảng xảy ra.
Click vào Next

Chọn vào “Create a virtual hard disk now” the default VMDK or VDI type and click the Next button

Chọn VDI → Next:

Chọn Dynamically Allocated (khi cần mới cấp phát dung lượng) và Click next

Cung cấp phân vùng chứa máy file VM. Đặt giới hạn cho VM của bạn mặc định là 400GB và Click Create

Sau khi click vào nút Create máy ảo dbwr1 sẽ được tạo như bên dưới:

Click vào General->Storage và chọn OEL7 ISO và click ok

Click vào General->Advanced và thay đổi shared clipboard thành Bidirectional và thay đổi Drag ‘n’ Drop thành Bidirectional và click Ok

Thêm 03 cạc mạng:
1)public
2)private
3)Internet để cài đặt các gói
Click vào General->Network-Adapter 1
Đảm bảo Adapter 1 được enable, Attached to là Internal Network hoặc Host-only Adapter. Cạc mạng này sẽ dùng làm Public network, và tất nhiên cùng dải mạng với VIP, Scan IP.

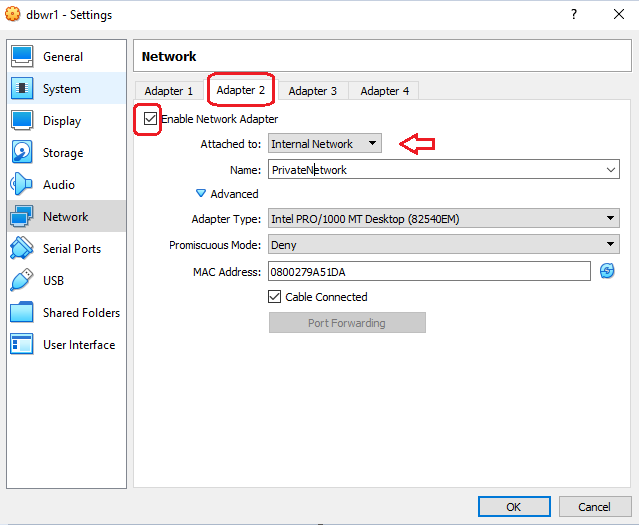
Click vào General->Network-Adapter 2
Đảm bảo Adapter 2 được enable và Attach to là Internal Network. Đây là thuộc dải private network
Click vào General->Network-Adapter 3
Enable Adapter 3 và Attached to là Bridged Adapter. Adapter này sẽ dùng để kết nối ra internet để cài đặt các gọi. Xong thì ấn nút OK

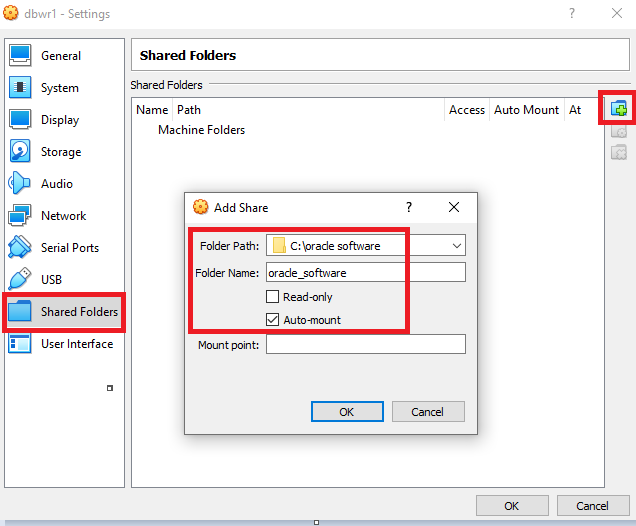
Click vào General->Shared Folder để lấy bộ cài từ thư mục của Windows mà không cần phải up lên server linux bằng cách mount lên máy chủ Linux.

Kiểm tra lại trước khi cài đặt Linux, sau đó click vào nút Start

Chọn file iso Oracle Linux và click vào nút Start

Sau khi khởi động sẽ nhìn thấy màn hình bên dưới và chọn Install Oracle Linux 7.3
2. Cài đặt Oracle Linux 7.3

Click Continue

Đây là màn hình chính, giờ chúng ta sẽ cấu hình:

Chọn Region và city và ấn nút Done:

Tiếp theo cọn installation Destination -> chọn ổ 400GB->Chọn I willl configure partitioning và ấn nút Done

Ấn vào nút + và đặt size cho /boot 2G

Ấn vào + và đặt cho /swap 25 GB

Ấn vào nút + và đặt cho /tmp 20GB
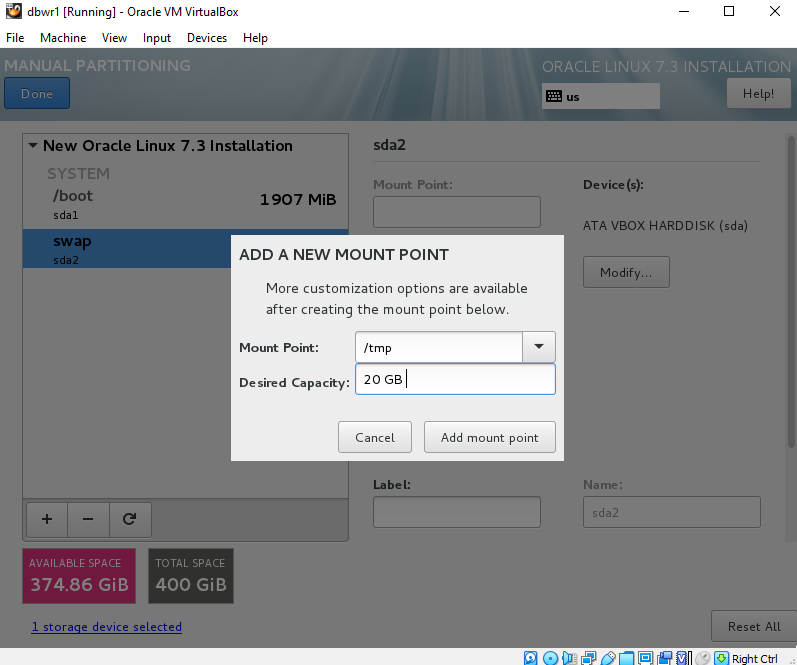
Ấn vào nút + và đặt vùng / 350G

Cuối cùng kiểm tra kỹ các mount point.

Lựa chọn chấp nhận các thay đổi

Chọn các gói cần cài đặt:
Server with GUI
Hardware Monitoring Utilities
Large Systems Performance
Network file system client
Performance Tools
Compatibility Libraries
Development Tools

Tiếp theo cấu hình mạng:

Chọn tag IPv4 Settings và thay đổi phương thức thành Manual; điền IP 192.168.24.1; Netmask: 255.255.255.0; Gateway: 0.0.0.0. Ấn save để hoàn thành

Chọn tab IPv4 Settings; thay đổi phương thức thành manual. Ấn Add và thêm: 192.168.10.1; Netmask: 255.255.255.0; Gateway: 0.0.0.0. Lưu lại và ấn nút done

Cuối cùng chọn cạc enp0s9, đây là cạc dùng để ra Internet, sau đó ấn chọn Connect automatically DHCP và ấn nút lưu để hoàn thành

Chúng ta đã hoàn thành cấu hình. Trước khi bắt đầu cài đặt kiểm tra đảm bảo tất cả đều sẵn sàng

Đặt mật khẩu cho root:

Sau khi cài đặt hoàn thành, ấn nút reboot

Chọn nút Accept

Kiểm tra mọi cạc mạng đều bật

Click nút Finish

Cài đặt các gọi yêu cầu trước của Linux
Đầu tiên kiểm tra đường Internet đảm bảo làm việc
ping oracledbwr.com
Gói oracle-database-preinstall-19c chứa các yêu cầu trước khi cài đặt trên Oracle Linux sử dụng Oracle Unbreakable Enterprise Kernel (UEK).
# yum update -y
# yum install -y oracle-database-preinstall-19c.x86_64
# yum install oracleasm-support
# yum install bind* -y
# sysctl -p
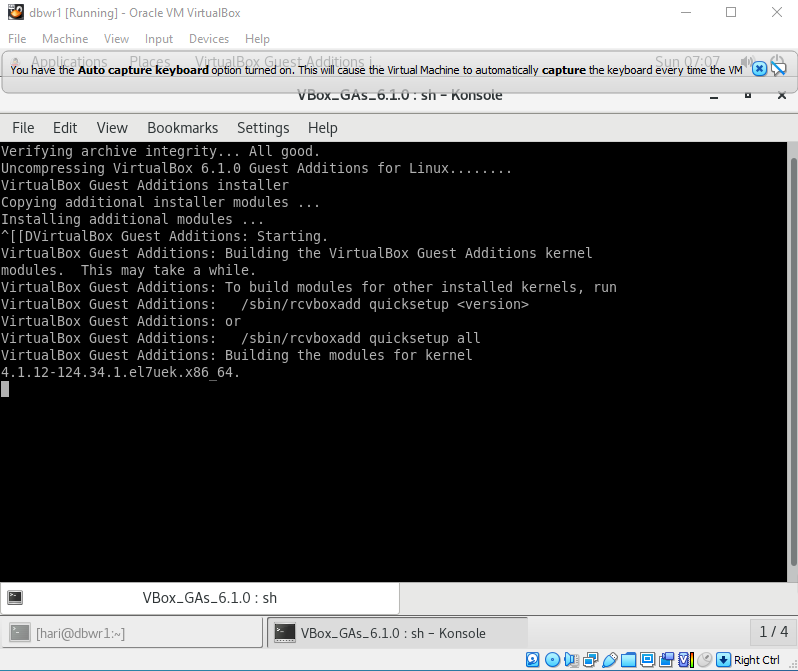
Mỗi khi Yum được cập nhật hãy cập nhật Vmbox tools.
Chọn device → Insert guest additions CD image

Thực thi nút Run

Vmox tools được cấu hình thành công mà không có lỗi gì là OK
Bây giờ bật Full Screen và chuột sẽ làm việc dễ dàng

Cấu hình file Hosts
[root@dbwr1 ~]# cat /etc/hosts
127.0.0.1 localhost localhost.localdomain localhost4 localhost4.localdomain4
::1 localhost localhost.localdomain localhost6 localhost6.localdomain6
# Public
192.168.24.1 dbwr1.localdomain dbwr1
192.168.24.2 dbwr2.localdomain dbwr2
# Private
192.168.10.1 dbwr1-priv.localdomain dbwr1-priv
192.168.10.2 dbwr2-priv.localdomain dbwr2-priv
# Virtual
192.168.24.31 dbwr1-vip.localdomain dbwr1-vip
192.168.24.32 dbwr2-vip.localdomain dbwr2-vip
# SCAN
192.168.24.41 dbwr-scan.localdomain dbwr-scan
192.168.24.42 dbwr-scan.localdomain dbwr-scan
192.168.24.43 dbwr-scan.localdomain dbwr-scan
Tạo các nhóm và phân quyền
[root@dbwr1 ~]# groupadd -g 54327 asmdba
[root@dbwr1 ~]# groupadd -g 54328 asmoper
[root@dbwr1 ~]# groupadd -g 54329 asmadmin
Bạn cần chạy lệnh usermod để gán nhóm cho user oracle (được tạo từ oracle-database-preinstall-19c)
# usermod -G asmdba,asmoper,asmadmin oracle
Tạo mật khẩu user Oracle:
[root@dbwr1 ~]# passwd oracle
Changing password for user oracle.
New password:
BAD PASSWORD: The password is shorter than 8 characters
Retype new password:
passwd: all authentication tokens updated successfully.
Tạo thư mục chứa Oracle software sẽ được cài đặt:
mkdir -p /u01/app/19c/grid
mkdir -p /u01/app/oracle/product/19c/db_1
chown -R oracle:oinstall /u01
chmod -R 775 /u01/
Cấu hình Bash Profile cho user:
Chúng ta sẽ cài đặt Grid Infrastructure và Oracle Software bằng user oracle
Cập nhật bash profile file cho user grid và oracle tương ứng như bên dưới.
Login bằng user “oracle” và thêm các dòng bên dưới vào file “/home/oracle/.bash_profile”:
# Oracle Settings
export TMP=/tmp
export TMPDIR=$TMP
export ORACLE_BASE=/u01/app/oracle
export GRID_HOME=/u01/app/19c/grid
export DB_HOME=$ORACLE_BASE/product/19c/db_1
export ORACLE_HOME=$DB_HOME
export ORACLE_SID=oradbwr1
export ORACLE_TERM=xterm
export BASE_PATH=/usr/sbin:$PATH
export PATH=$ORACLE_HOME/bin:$BASE_PATH
export LD_LIBRARY_PATH=$ORACLE_HOME/lib:/lib:/usr/lib
export CLASSPATH=$ORACLE_HOME/JRE:$ORACLE_HOME/jlib:$ORACLE_HOME/rdbms/jlib
alias grid='. /home/oracle/grid.env'
alias db='. /home/oracle/db.env'
Bash profile cho grid
Tạo file “/home/oracle/grid.env” với nội dung như sau:
export ORACLE_SID=+ASM1
export ORACLE_HOME=$GRID_HOME
export PATH=$ORACLE_HOME/bin:$BASE_PATH
export LD_LIBRARY_PATH=$ORACLE_HOME/lib:/lib:/usr/lib
export CLASSPATH=$ORACLE_HOME/JRE:$ORACLE_HOME/jlib:$ORACLE_HOME/rdbms/jlib
Bash profile cho Oracle Home
Tạo file “/home/oracle/db.env” với nội dung như bên dưới:
export ORACLE_SID=oradbwr1
export ORACLE_HOME=$DB_HOME
export PATH=$ORACLE_HOME/bin:$BASE_PATH
export LD_LIBRARY_PATH=$ORACLE_HOME/lib:/lib:/usr/lib
export CLASSPATH=$ORACLE_HOME/JRE:$ORACLE_HOME/jlib:$ORACLE_HOME/rdbms/jlib
Tắt và disable Firewall:
Có thể bật lại firewall sau khi cài đặt:
systemctl stop firewalld.service
systemctl disable firewalld.service
Cấu hình Chrony NTP:
systemctl enable chronyd.service
systemctl restart chronyd.service
chronyc -a ‘burst 4/4’
chronyc -a makestep
3. Cấu hình DNS nameserver (có thể bỏ qua)
3.1. Kiểm tra gói Bind:
[root@dbwr1 ~]# rpm -qa | grep bind
Sau khi kiểm tra gói bind, cấu hình zone file ở file ‘named.conf‘
3.2. Và sửa cấu hình của name server
[root@dbwr1 ~]# cp /etc/named.conf /etc/named.conf_bkp
[root@racpb1:~ ] vim /etc/named.conf
// named.conf
//
// Provided by Red Hat bind package to configure the ISC BIND named(8) DNS
// server as a caching only nameserver (as a localhost DNS resolver only).
//
// See /usr/share/doc/bind*/sample/ for example named configuration files.
//
// See the BIND Administrator’s Reference Manual (ARM) for details about the
// configuration located in /usr/share/doc/bind-{version}/Bv9ARM.html
options {
listen-on port 53 { 127.0.0.1; 192.168.24.1; };
listen-on-v6 port 53 { ::1; };
directory “/var/named”;
dump-file “/var/named/data/cache_dump.db”;
statistics-file “/var/named/data/named_stats.txt”;
memstatistics-file “/var/named/data/named_mem_stats.txt”;
recursing-file “/var/named/data/named.recursing”;
secroots-file “/var/named/data/named.secroots”;
allow-query { localhost; 192.168.24.0/24; };
/*
– If you are building an AUTHORITATIVE DNS server, do NOT enable recursion.
– If you are building a RECURSIVE (caching) DNS server, you need to enable
recursion.
– If your recursive DNS server has a public IP address, you MUST enable access
control to limit queries to your legitimate users. Failing to do so will
cause your server to become part of large scale DNS amplification
attacks. Implementing BCP38 within your network would greatly
reduce such attack surface
*/
recursion yes;
dnssec-enable yes;
dnssec-validation yes;
/* Path to ISC DLV key */
bindkeys-file “/etc/named.root.key”;
managed-keys-directory “/var/named/dynamic”;
pid-file “/run/named/named.pid”;
session-keyfile “/run/named/session.key”;
};
logging {
channel default_debug {
file “data/named.run”;
severity dynamic;
};
};
zone “.” IN {
type hint;
file “named.ca”;
};
zone “localdomain.com” IN {
type master;
file “localdomain.zone”;
allow-update { none; };
};
zone “24.168.192.in-addr.arpa.” IN {
type master;
file “24.168.192.in-addr.arpa”;
allow-update { none; };
};
include “/etc/named.rfc1912.zones”;
include “/etc/named.root.key”;
Save and Exit the named.conf using wq!
3.3. Tạo Forward Zone và Reserve Zone files như đề cập ở file named.conf
FORWARD ZONE :
a.) Tạo file Forward Zone file /var/named trong localdomain.zone
b.) Copy sample file như bên dưới:
[root@dbwr1 ~]# cp /var/named/named.localhost /var/named/localdomain.zone
c.) Sửa file localdomain.zone
[root@dbwr1 ~]# vim /var/named/localdomain.zone
$TTL 86400
@ IN SOA dbwr1.localdomain.com. root.localdomain.com. (
2014051001 ; serial
3600 ; refresh
1800 ; retry
604800 ; expire
86400 ; minimum
)
@ IN NS dbwr1.localdomain.
localhost IN A 127.0.0.1
dbwr1 IN A 192.168.24.1
dbwr2 IN A 192.168.24.2
dbwr1-priv IN A 192.168.10.1
dbwr2-priv IN A 192.168.10.1
dbwr1-vip IN A 192.168.24.31
dbwr2-vip IN A 192.168.24.32
dbwr-scan IN A 192.168.24.41
dbwr-scan IN A 192.168.24.42
dbwr-scan IN A 192.168.24.43
3.4) RESERVE ZONE :
a.) Tạo Reserver Zone trong /var/named với tên:
24.168.192.in-addr.arpa
File mẫu trong thư mục /var/named/, chỉ càn copy fiel và chỉnh sửa
b.) Copy file mẫu như bên dưới:
[root@dbwr1 ~]# cp /var/named/named.loopback /var/named/24.168.192.in-addr.arpa
c.) Sửa file 24.168.192.in-addr.arpa
[root@dbwr1 ~]# vim /var/named/24.168.192.in-addr.arpa
$TTL 86400
@ IN SOA dbwr1.localdomain.com. root.localdomain.com. (
2
3H
1H
1W
1H )
@ IN NS dbwr1.localdomain.com.
@ IN PTR localdomain.com.
dbwr1 IN A 192.168.24.1
dbwr-scan IN A 192.168.24.41
dbwr-scan IN A 192.168.24.42
dbwr-scan IN A 192.168.24.43
1 IN PTR dbwr1.localdomain.com.
41 IN PTR dbwr-scan.localdomain.
42 IN PTR dbwr-scan.localdomain.
43 IN PTR dbwr-scan.localdomain.
3.5. File được tạo ở root group, cần thay đổi về named group
a.) Thay đổi group về named
[root@dbwr1 ~]# chgrp named /var/named/localdomain.zone
[root@dbwr1 ~]# chgrp named /var/named/24.168.192.in-addr.arpa
b.) Sau đó kiểm tra lại:
[root@dbwr1 named]# ls -lZd /etc/named.conf
-rwxrwxr-x. root root unconfined_u:object_r:etc_t:s0 /etc/named.conf
Nó giống với named_conf_t
Nếu nó khác có thể restore lại:
[root@masterdns:~:] restorecon /etc/named.conf
3.6. Bật dịch vụ DNS
[root@racpb1:~ ] systemctl start named.service
3.7. Triển khai iptables Rules để cho phép dịch vụ DNS
Thêm iptables rules:
[root@racpb1:~ ] iptables -A INPUT -i lo -j ACCEPT
[root@racpb1:~ ] iptables -A INPUT -m state –state ESTABLISHED,RELATED -j ACCEPT
[root@racpb1:~ ] iptables -A INPUT -p tcp -m state –state NEW -m tcp –dport 22 -j ACCEPT
[root@racpb1:~ ] iptables -A INPUT -p tcp -m state –state NEW -m tcp –dport 53 -j ACCEPT
[root@racpb1:~ ] iptables -A INPUT -p udp -m state –state NEW -m udp –dport 53 -j ACCEPT
[root@racpb1:~ ] iptables -A INPUT -j DROP
3.8. Đảm bảo địa chỉ IP của DNS server như bên dưới:
[root@dbwr1 ~]# cat /etc/resolv.conf
# Generated by NetworkManager
search localdomain
nameserver 192.168.24.1
options timeout:1
options attempts:5
3.9. Bây giờ kiểm tra thử:
[root@dbwr1 ~]# nslookup dbwr-scan
Server: 192.168.24.1
Address: 192.168.24.1#53
Name: dbwr-scan.localdomain
Address: 192.168.24.43
Name: dbwr-scan.localdomain
Address: 192.168.24.42
Name: dbwr-scan.localdomain
Address: 192.168.24.41
3.10. Backup VMbox sáng node thứ 2 và thêm Diskgroup
Bây giờ chúng ta tắt máy ảo và thực hiện backup và thêm asm disks
[root@dbwr1 19c]# init 0
Backup VMBox
Click File → Export Appliance

Chọn VMBox name và ấn Next

Chọn vị trí backup → Next:
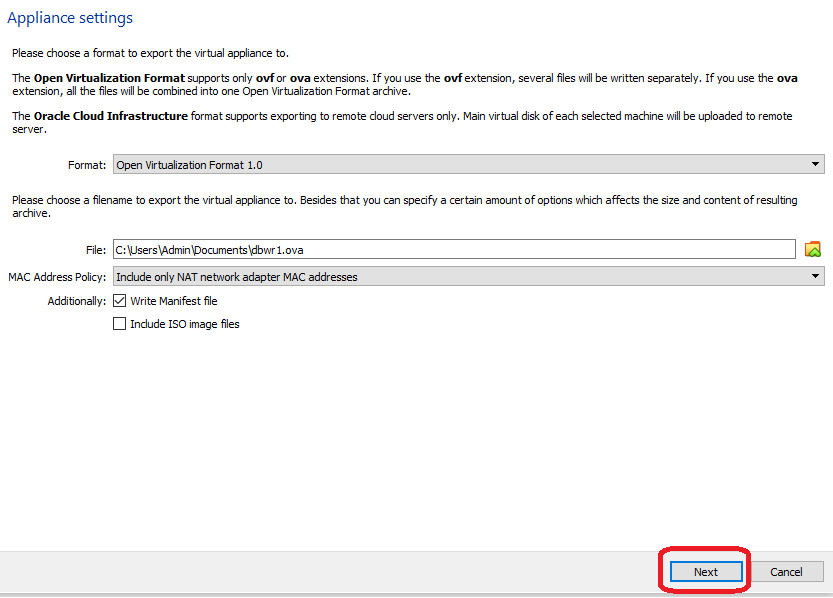
Click export

Chuẩn bị ASM Disk Group:
Sau khi hoàn thành backup. Chúng ta sẽ thêm đĩa vào ASM storage.
Click General-> Storage->Hard Disk

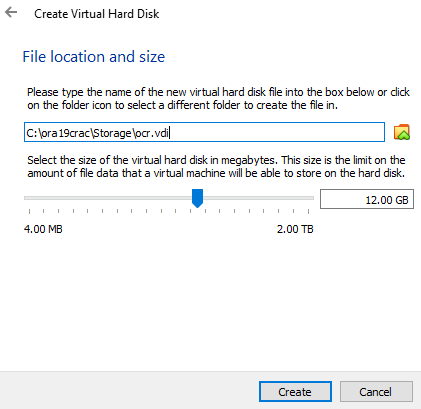
Click Create và chọn VDI

Chọn Fixed Size (Không được quên) → Next

Chọn vị trí lưu trữ và dung lượng 35GB:
Trong trường này này chúng ta sẽ có 3 thưc mục lưu trữ: Rac1,Rac2,Storage

Tương tự với địa thứ 2 tạo với OCR

4. Copy Virtual Box cho node 2: Chuẩn bị
Select File and Click Import button

Bây giờ cần restore bản backup mới nhất để tạo ra dbwr2

Đổi tên là DBWR2 và thay đổi đường dẫn như bên dưới:
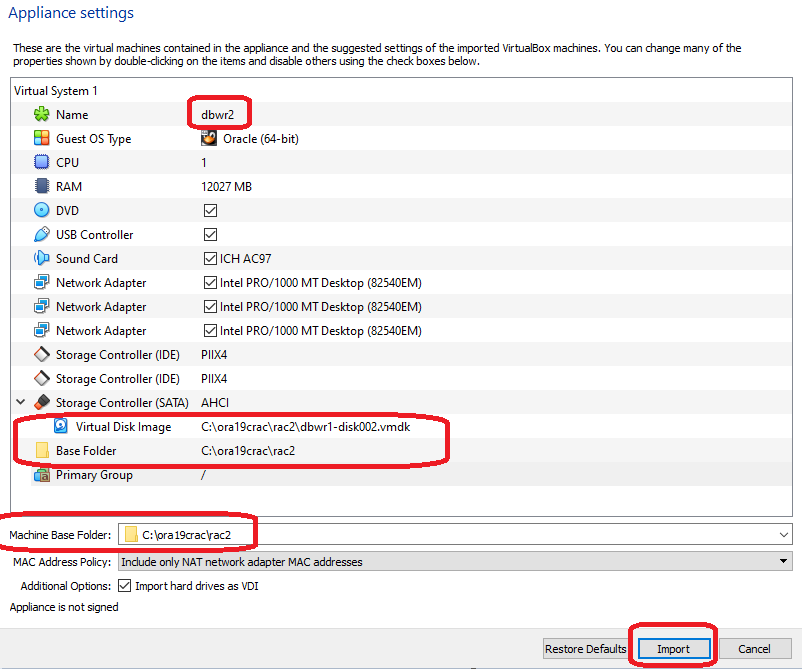
Import thành công như bên dưới:
5. Tạo Shared Disk
Sau khi import thành công, chúng ta sẽ thay đổi đĩa thành dạng shared để chúng ta tạo trong ASM
Chọn File → Virtual media manager

Chọn ASM Disk 35 GB và chọn Type là shareable

Chọn đĩa ASM Disk 12 GB và chọn Type là shareable

Chọn Release
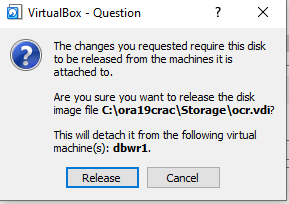
Các đĩa được thay đổi thành dạng Shareable, bây giờ chúng ta sẽ thêm đĩa vào node 2
Chọn node 2 → General -> Storage -> Hard disk

Chọn đĩa và thêm vào (35 GB and 12 GB)

Các đĩa Asm được thêm vào node 2:

Bây giờ bật node 2 và thay đổi IP (Chỉ thực hiện trên node 2)

Thay đổi Host name
[root@dbwr1 ~]# nmcli general hostname
dbwr1.localdomain
[root@dbwr1 ~]# nmcli general hostname dbwr2.localdomain
[root@dbwr1 ~]# nmcli general hostname
dbwr2.localdomain
[root@dbwr1 ~]# service systemd-hostnamed restart
Redirecting to /bin/systemctl restart systemd-hostnamed.service
[root@dbwr1 ~]# hostname
dbwr2.localdomain
Thay đổi IP mạng:
Chọn Applications → System Tool s→ Settings
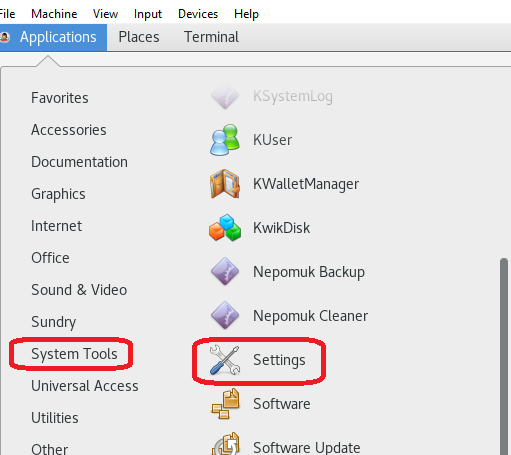
Click network

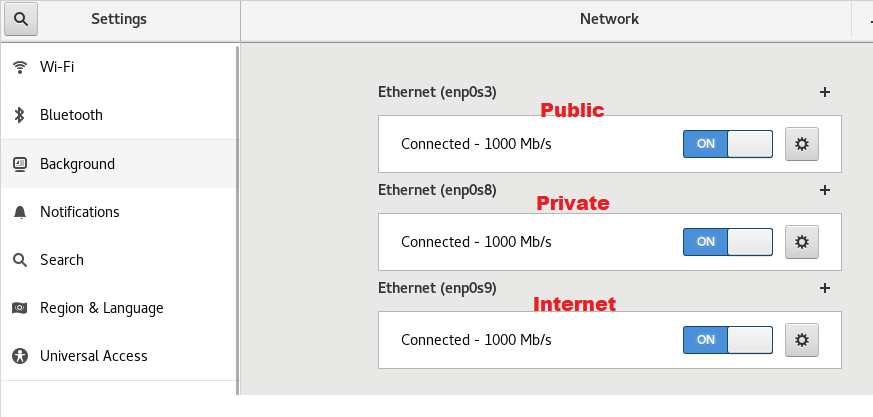
Chắc chắn rằng sau khi thay đổi các IP bên dưới và chọn vào phần kết nối tự động (Connect automatically):


[root@dbwr2 ~]# systemctl restart network
[root@dbwr2 ~]# ifconfig
enp0s3: flags=4163<UP,BROADCAST,RUNNING,MULTICAST> mtu 1500
inet 192.168.24.2 netmask 255.255.255.0 broadcast 192.168.24.255
inet6 fe80::decd:b0e6:ab4:dcf3 prefixlen 64 scopeid 0x20<link>
ether 08:00:27:61:ae:37 txqueuelen 1000 (Ethernet)
RX packets 24 bytes 2661 (2.5 KiB)
RX errors 0 dropped 0 overruns 0 frame 0
TX packets 86 bytes 11585 (11.3 KiB)
TX errors 0 dropped 0 overruns 0 carrier 0 collisions 0
enp0s8: flags=4163<UP,BROADCAST,RUNNING,MULTICAST> mtu 1500
inet 192.168.10.2 netmask 255.255.255.0 broadcast 192.168.10.255
inet6 fe80::1591:1c9f:58ad:c650 prefixlen 64 scopeid 0x20<link>
ether 08:00:27:6b:63:7d txqueuelen 1000 (Ethernet)
RX packets 0 bytes 0 (0.0 B)
RX errors 0 dropped 0 overruns 0 frame 0
TX packets 133 bytes 21055 (20.5 KiB)
TX errors 0 dropped 0 overruns 0 carrier 0 collisions 0
Kiểm tra lại mạng:
ping -c 2 dbwr1
ping -c 2 dbwr2
ping -c 2 dbwr1-priv
ping -c 2 dbwr2-priv
[root@dbwr1 ~]# nslookup dbwr-scan
Server: 192.168.24.1
Address: 192.168.24.1#53
Name: dbwr-scan.localdomain
Address: 192.168.24.43
Name: dbwr-scan.localdomain
Address: 192.168.24.41
Name: dbwr-scan.localdomain
Address: 192.168.24.42
Cấu hình Bash Profile cho user
Thay đổi dòng sau của file /home/oracle/.bash_profile:
export ORACLE_SID=oradbwr2
Bash profile cho grid
Thay đổi dòng sau của file /home/oracle/grid.env:
export ORACLE_SID=+ASM2
Bash profile cho Oracle Home
Thay đổi dòng sau của file “/home/oracle/db.env” với nội dung như bên dưới:
export ORACLE_SID=oradbwr2
Copy oracle 19c grid software sử dụng thư mục share:
[root@dbwr1 19c]# pwd/media/sf_oracle_software/19c
[root@dbwr1 19c]# cp LINUX.X64_193000_grid_home.zip /u01/app/19c/grid/
[root@dbwr1 19c]#unzip LINUX.X64_193000_grid_home.zip
Cài đặt package cvudisk từ grid home bằng user “root” trên 2 node:
Node 1:
[root@dbwr1 grid]# cd /u01/app/19c/grid/cv/rpm
[root@dbwr1 rpm]# rpm -Uvh cvuqdisk*
Preparing… ################################# [100%]
Using default group oinstall to install package
Updating / installing…
1:cvuqdisk-1.0.10-1 ################################# [100%]
Node 2:
scp ./cvuqdisk* root@dbwr2:/tmp
ssh root@dbwr2 rpm -Uvh /tmp/cvuqdisk*
6. Configure Oracle ASM
Dùng lệnh fdisk -l kiểm tra trước khi format.
[root@dbwr1 ~]# fdisk /dev/sdb
Welcome to fdisk (util-linux 2.23.2).
Changes will remain in memory only, until you decide to write them.
Be careful before using the write command.
Device does not contain a recognized partition table
Building a new DOS disklabel with disk identifier 0xd0e0d61b.
Command (m for help): n
Partition type:
p primary (0 primary, 0 extended, 4 free)
e extended
Select (default p): p
Partition number (1-4, default 1):
First sector (2048-25165823, default 2048):
Using default value 2048
Last sector, +sectors or +size{K,M,G} (2048-25165823, default 25165823):
Using default value 25165823
Partition 1 of type Linux and of size 12 GiB is set
Command (m for help): w
The partition table has been altered!
Calling ioctl() to re-read partition table.
Syncing disks.
[root@dbwr1 ~]# fdisk /dev/sdc
Welcome to fdisk (util-linux 2.23.2).
Changes will remain in memory only, until you decide to write them.
Be careful before using the write command.
Device does not contain a recognized partition table
Building a new DOS disklabel with disk identifier 0x6c7dc5e4.
Command (m for help): n
Partition type:
p primary (0 primary, 0 extended, 4 free)
e extended
Select (default p): p
Partition number (1-4, default 1):
First sector (2048-73400319, default 2048):
Using default value 2048
Last sector, +sectors or +size{K,M,G} (2048-73400319, default 73400319):
Using default value 73400319
Partition 1 of type Linux and of size 35 GiB is set
Command (m for help): w
The partition table has been altered!
Calling ioctl() to re-read partition table.
Syncing disks.
Cấu hình với oracleasm utility
[root@dbwr1 grid]# /usr/sbin/oracleasm configure -i
Configuring the Oracle ASM library driver.
This will configure the on-boot properties of the Oracle ASM library
driver. The following questions will determine whether the driver is
loaded on boot and what permissions it will have. The current values
will be shown in brackets (‘[]’). Hitting <ENTER> without typing an
answer will keep that current value. Ctrl-C will abort.
Default user to own the driver interface []: oracle
Default group to own the driver interface []: oinstall
Start Oracle ASM library driver on boot (y/n) [n]: y
Scan for Oracle ASM disks on boot (y/n) [y]: y
Writing Oracle ASM library driver configuration: done
Kiểm tra disk dùng lệnh:
[root@dbwr1 grid]# /usr/sbin/oracleasm configure
ORACLEASM_ENABLED=true
ORACLEASM_UID=oracle
ORACLEASM_GID=oinstall
ORACLEASM_SCANBOOT=true
ORACLEASM_SCANORDER=””
ORACLEASM_SCANEXCLUDE=””
ORACLEASM_SCAN_DIRECTORIES=””
ORACLEASM_USE_LOGICAL_BLOCK_SIZE=”false”
Khởi tạo asmlib với lệnh oracleasm init để load module oracleasm và mount oracleasm filesystem:-
[root@dbwr1 grid]# /usr/sbin/oracleasm init
Creating /dev/oracleasm mount point: /dev/oracleasm
Loading module “oracleasm”: oracleasm
Configuring “oracleasm” to use device physical block size
Mounting ASMlib driver filesystem: /dev/oracleasm
Khi ASMLIB được cấu hình, 1 file system đặc biệt được tạo và mount vào /dev/oracleasm, bạn chú ý lệnh bên dưới với df:
[root@dbwr1 grid]# df -ha | grep oracle
oracle_software 931G 315G 617G 34% /media/sf_oracle_software
oracleasmfs 0 0 0 – /dev/oracleasm
[root@dbwr1 grid]# oracleasm createdisk ASMDISK_OCR /dev/sdb1
Writing disk header: done
Instantiating disk: done
[root@dbwr1 grid]# oracleasm createdisk ASMDISK_DATA /dev/sdc1
Writing disk header: done
Instantiating disk: done
[root@dbwr1 grid]# cd /dev/oracleasm/disks
[root@dbwr1 disks]# ls -lrt
total 0
brw-rw—-. 1 oracle oinstall 8, 17 Dec 31 11:13 ASMDISK_DATA
brw-rw—-. 1 oracle oinstall 8, 33 Dec 31 11:13 ASMDISK_OCR
[root@dbwr1 disks]# oracleasm scandisks
Reloading disk partitions: done
Cleaning any stale ASM disks…
Scanning system for ASM disks…
[root@dbwr1 disks]# oracleasm listdisks
ASMDISK_DATA
ASMDISK_OCR
Node 2
[root@dbwr2 grid]# /usr/sbin/oracleasm configure -i
Configuring the Oracle ASM library driver.
This will configure the on-boot properties of the Oracle ASM library
driver. The following questions will determine whether the driver is
loaded on boot and what permissions it will have. The current values
will be shown in brackets (‘[]’). Hitting <ENTER> without typing an
answer will keep that current value. Ctrl-C will abort.
Default user to own the driver interface []: oracle
Default group to own the driver interface []: oinstall
Start Oracle ASM library driver on boot (y/n) [n]: y
Scan for Oracle ASM disks on boot (y/n) [y]: y
Writing Oracle ASM library driver configuration: done
[root@dbwr2 grid]# /usr/sbin/oracleasm init
Creating /dev/oracleasm mount point: /dev/oracleasm
Loading module “oracleasm”: oracleasm
Configuring “oracleasm” to use device physical block size
Mounting ASMlib driver filesystem: /dev/oracleasm
[root@dbwr2 grid]# oracleasm scandisks
Reloading disk partitions: done
Cleaning any stale ASM disks…
Scanning system for ASM disks…
Instantiating disk “ASMDISK_OCR”
Instantiating disk “ASMDISK_DATA”
[root@dbwr2 grid]# oracleasm listdisks
ASMDISK_DATA
ASMDISK_OCR
Cấu hình SSH Setup
[oracle@dbwr1 deinstall]$ pwd
/u01/app/19c/grid/deinstall
[oracle@dbwr1 deinstall]$ ./sshUserSetup.sh -user oracle -hosts “dbwr1 dbwr2” -noPromptPassphrase -confirm -advanced
7. Pre-check để cài đặt RAC
Pre-check để cài đặt CRS installation với cluvfy
Chúng ta sử dụng lệnh cluvfy để kiểm tra cluster đã sẵn sàng cho việc cài đặt Grid Infrastructure không.
[oracle@dbwr1 grid]$ ./runcluvfy.sh stage -pre crsinst -n dbwr1,dbwr2 -verbose
Hiển thị cáu hình và bắt đầu quá trình cài đặt Grid
su –
export DISPLAY=:0.0
xhost +
su – oracle
[oracle@dbwr1 ~]$ DISPLAY=dbwr1.localdomain:0.0; export DISPLAY
(Nên dùng MobaXterm để hiển thị giao diện dễ hơn, có thể dùng NVC, Putty cũng OK, tham khảo thêm tại đây)
8. Cài đặt và cấu hình Oracle 19c Grid Infrastructure cho Cluster
[oracle@dbwr1 ~]$ cd /u01/app/19c/grid/
[oracle@dbwr1 grid]$ ./gridSetup.sh
Launching Oracle Grid Infrastructure Setup Wizard…
Chọn “Configure Oracle Grid Infrastructure for a New Cluster” → Next

Cọn “Configure an Oracle Standalone Cluster” → Next

Đặt tên Ccluster Name là dbwr-cluster, SCAN name dbwr-scan and SCAN port 1521, → Next

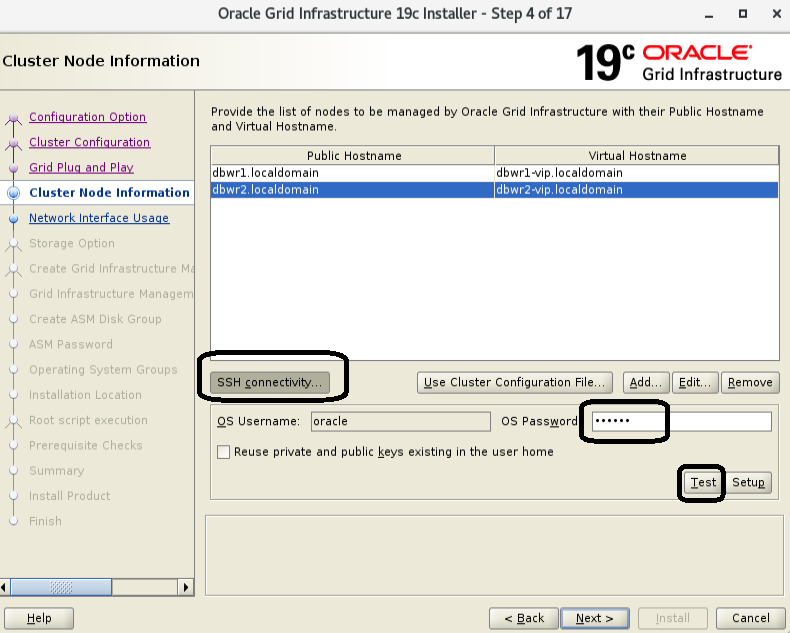
Ở màn hình “Cluster Node Information”, click vào nút Add
Thêm thông tin node 2 của clusster → OK

Click “SSH connectivity” và thêm mật khẩu oracle. Click vào nút Setup để cấu hình kết nối SSH đảm bảo thông suốt, và ấn vào nút Test để kiểm tra 1 lần nữa. Sau đó click nút Next

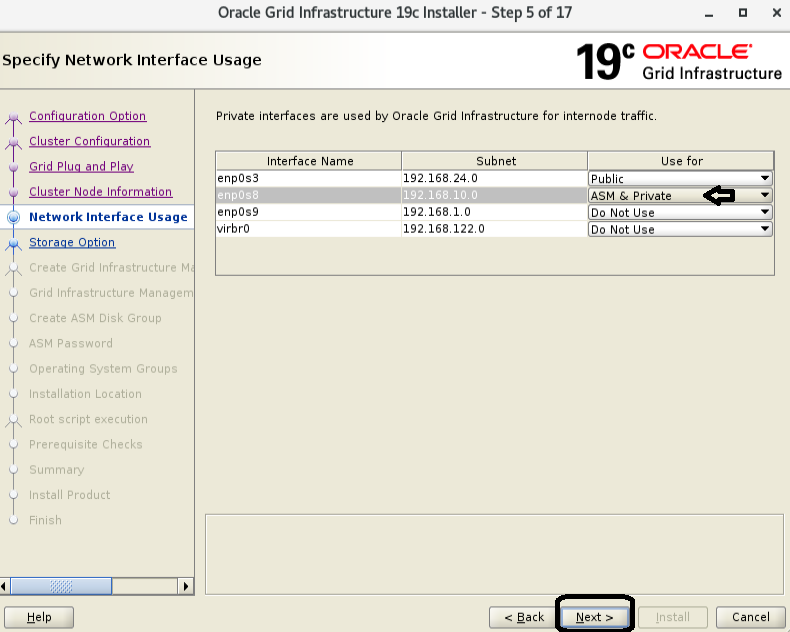
Kiểm tra mạng public và private networks đảm bảo đúng với ASM & Private → Click nút Next
Chọn “Use Oracle Flex ASM for Storage” → Next

Chọn No, chúng ta sẽ không tạo diskgroup riêng biệt cho GIMR → Next

Đầu tiên tìm đĩa ở đường dẫn /dev/oracleasm/disks* để tìm ra các đĩa:

Đặt redundancy là External, click vào disk 35GB cấu hình cho diskgroup OCR (với Product OCR Diskgroup chọn Normal, mỗi đĩa 50GB) → Next.

Chọn “Use same password for these accounts”, đặt mật khẩu là oracle

Chọn “Do not use Intelligent Platform Management Interface (IPMI) → Next .

Không chọn EM → Next

Thiết lập group oinstall và click nút Next. Chấp nhận các cảnh báo xuất hiện và click vào nút Yes

Click vào nút Next

Chấp nhận default inventory directory, sau đó click Next
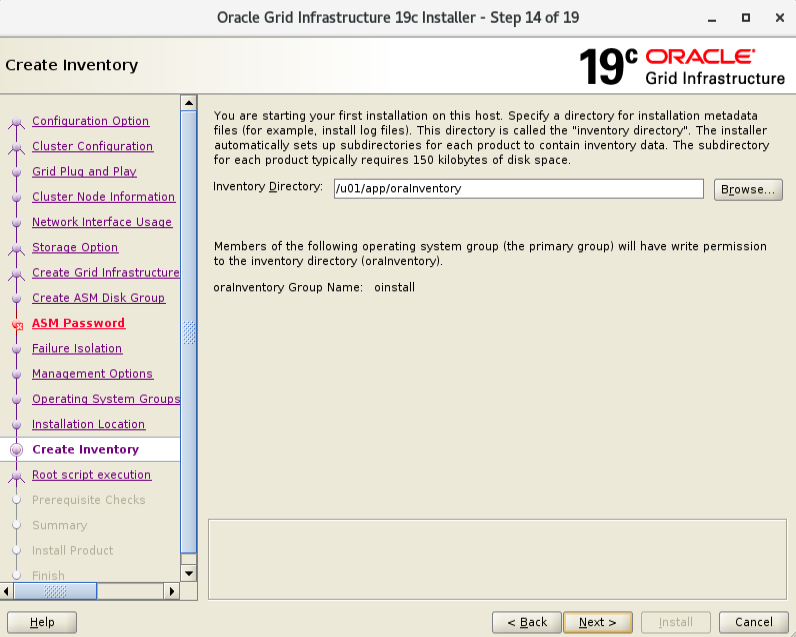
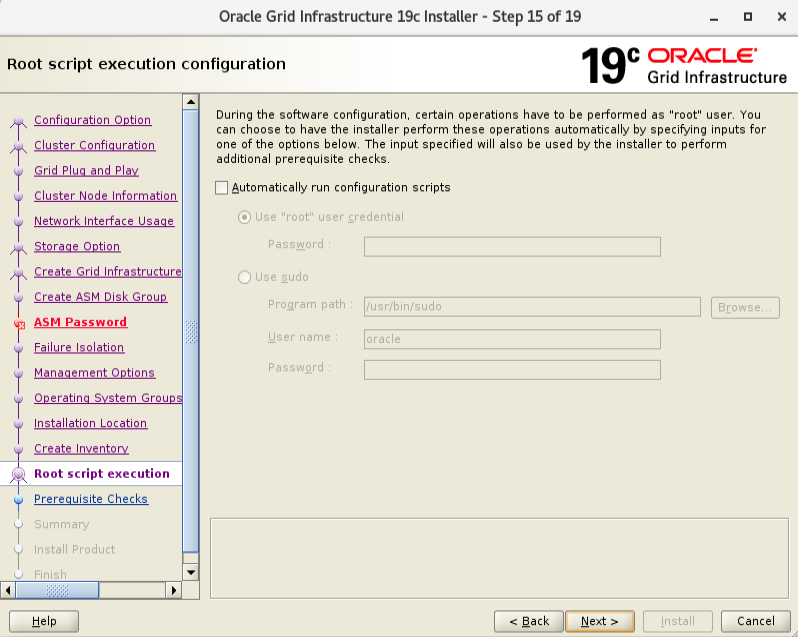
Click nút Next
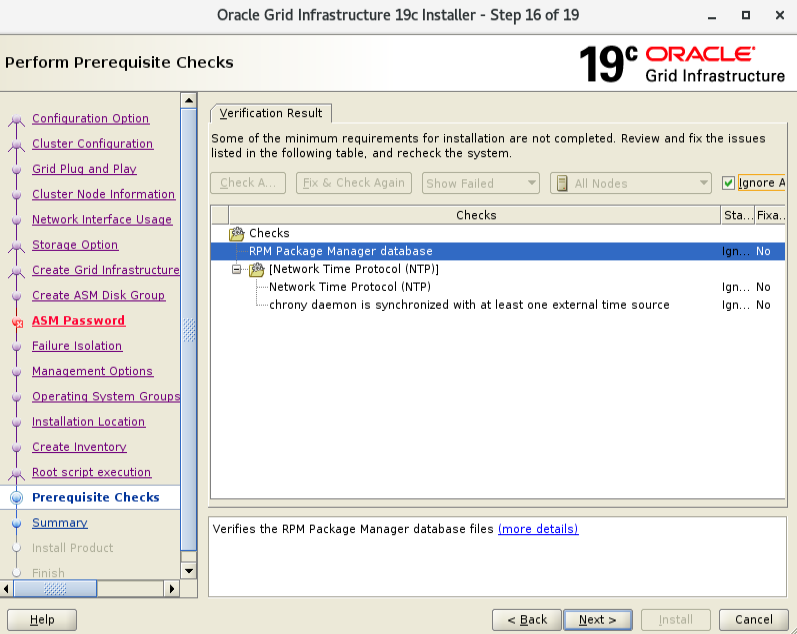
Chọn “Ignore All checkbox” và click vào nút Next
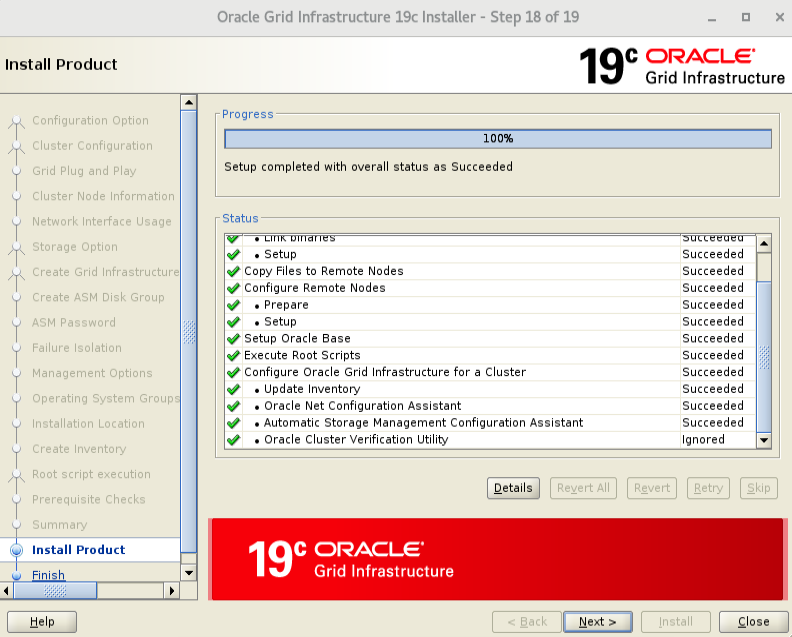
Kiểm tra lại và click vào nút Install

Khi gặp hội thoại, chạy script trên mỗi node bằng user root:

Node 1
[root@dbwr1 run]# /u01/app/oraInventory/orainstRoot.sh
Changing permissions of /u01/app/oraInventory.
Adding read,write permissions for group.
Removing read,write,execute permissions for world.
Changing groupname of /u01/app/oraInventory to oinstall.
The execution of the script is complete.
Node 2
[root@dbwr2 grid]# /u01/app/oraInventory/orainstRoot.sh
Changing permissions of /u01/app/oraInventory.
Adding read,write permissions for group.
Removing read,write,execute permissions for world.
Changing groupname of /u01/app/oraInventory to oinstall.
The execution of the script is complete.
Node 1
[root@dbwr1 run]# /u01/app/19c/grid/root.sh
Performing root user operation.
The following environment variables are set as:
ORACLE_OWNER= oracle
ORACLE_HOME= /u01/app/19c/grid
Enter the full pathname of the local bin directory: [/usr/local/bin]:
Copying dbhome to /usr/local/bin …
Copying oraenv to /usr/local/bin …
Copying coraenv to /usr/local/bin …
Creating /etc/oratab file…
Entries will be added to the /etc/oratab file as needed by
Database Configuration Assistant when a database is created
Finished running generic part of root script.
Now product-specific root actions will be performed.
Relinking oracle with rac_on option
Using configuration parameter file: /u01/app/19c/grid/crs/install/crsconfig_params
The log of current session can be found at:
/u01/app/oracle/crsdata/dbwr1/crsconfig/rootcrs_dbwr1_2019-12-31_03-04-07PM.log
2019/12/31 15:05:54 CLSRSC-594: Executing installation step 1 of 19: ‘SetupTFA’.
2019/12/31 15:05:54 CLSRSC-594: Executing installation step 2 of 19: ‘ValidateEnv’.
2019/12/31 15:05:54 CLSRSC-363: User ignored prerequisites during installation
2019/12/31 15:05:55 CLSRSC-594: Executing installation step 3 of 19: ‘CheckFirstNode’.
2019/12/31 15:06:02 CLSRSC-594: Executing installation step 4 of 19: ‘GenSiteGUIDs’.
2019/12/31 15:06:06 CLSRSC-594: Executing installation step 5 of 19: ‘SetupOSD’.
2019/12/31 15:06:06 CLSRSC-594: Executing installation step 6 of 19: ‘CheckCRSConfig’.
2019/12/31 15:06:07 CLSRSC-594: Executing installation step 7 of 19: ‘SetupLocalGPNP’.
2019/12/31 15:08:34 CLSRSC-4002: Successfully installed Oracle Trace File Analyzer (TFA) Collector.
2019/12/31 15:08:39 CLSRSC-594: Executing installation step 8 of 19: ‘CreateRootCert’.
2019/12/31 15:08:58 CLSRSC-594: Executing installation step 9 of 19: ‘ConfigOLR’.
2019/12/31 15:09:36 CLSRSC-594: Executing installation step 10 of 19: ‘ConfigCHMOS’.
2019/12/31 15:09:36 CLSRSC-594: Executing installation step 11 of 19: ‘CreateOHASD’.
2019/12/31 15:09:50 CLSRSC-594: Executing installation step 12 of 19: ‘ConfigOHASD’.
2019/12/31 15:09:51 CLSRSC-330: Adding Clusterware entries to file ‘oracle-ohasd.service’
2019/12/31 15:12:06 CLSRSC-594: Executing installation step 13 of 19: ‘InstallAFD’.
2019/12/31 15:12:21 CLSRSC-594: Executing installation step 14 of 19: ‘InstallACFS’.
2019/12/31 15:14:34 CLSRSC-594: Executing installation step 15 of 19: ‘InstallKA’.
2019/12/31 15:14:48 CLSRSC-594: Executing installation step 16 of 19: ‘InitConfig’.
ASM has been created and started successfully.
[DBT-30001] Disk groups created successfully. Check /u01/app/oracle/cfgtoollogs/asmca/asmca-191231PM031547.log for details.
2019/12/31 15:22:26 CLSRSC-482: Running command: ‘/u01/app/19c/grid/bin/ocrconfig -upgrade oracle oinstall’
CRS-4256: Updating the profile
Successful addition of voting disk 9dbe409170c24f0abf8890b6ff79694c.
Successfully replaced voting disk group with +OCR_DISK.
CRS-4256: Updating the profile
CRS-4266: Voting file(s) successfully replaced
## STATE File Universal Id File Name Disk group
— —– —————– ——— ———
1. ONLINE 9dbe409170c24f0abf8890b6ff79694c (/dev/oracleasm/disks/ASMDISK_DATA) [OCR_DISK]
Located 1 voting disk(s).
2019/12/31 15:26:21 CLSRSC-594: Executing installation step 17 of 19: ‘StartCluster’.
2019/12/31 15:29:07 CLSRSC-343: Successfully started Oracle Clusterware stack
2019/12/31 15:29:08 CLSRSC-594: Executing installation step 18 of 19: ‘ConfigNode’.
2019/12/31 15:36:21 CLSRSC-594: Executing installation step 19 of 19: ‘PostConfig’.
2019/12/31 15:38:35 CLSRSC-325: Configure Oracle Grid Infrastructure for a Cluster … succeeded
Node 2
[root@dbwr2 grid]# /u01/app/19c/grid/root.sh
Performing root user operation.
The following environment variables are set as:
ORACLE_OWNER= oracle
ORACLE_HOME= /u01/app/19c/grid
Enter the full pathname of the local bin directory: [/usr/local/bin]:
Copying dbhome to /usr/local/bin …
Copying oraenv to /usr/local/bin …
Copying coraenv to /usr/local/bin …
Creating /etc/oratab file…
Entries will be added to the /etc/oratab file as needed by
Database Configuration Assistant when a database is created
Finished running generic part of root script.
Now product-specific root actions will be performed.
Relinking oracle with rac_on option
Using configuration parameter file: /u01/app/19c/grid/crs/install/crsconfig_params
The log of current session can be found at:
/u01/app/oracle/crsdata/dbwr2/crsconfig/rootcrs_dbwr2_2019-12-31_03-39-53PM.log
2019/12/31 15:42:39 CLSRSC-594: Executing installation step 1 of 19: ‘SetupTFA’.
2019/12/31 15:42:39 CLSRSC-594: Executing installation step 2 of 19: ‘ValidateEnv’.
2019/12/31 15:42:39 CLSRSC-363: User ignored prerequisites during installation
2019/12/31 15:42:39 CLSRSC-594: Executing installation step 3 of 19: ‘CheckFirstNode’.
2019/12/31 15:42:44 CLSRSC-594: Executing installation step 4 of 19: ‘GenSiteGUIDs’.
2019/12/31 15:42:45 CLSRSC-594: Executing installation step 5 of 19: ‘SetupOSD’.
2019/12/31 15:42:45 CLSRSC-594: Executing installation step 6 of 19: ‘CheckCRSConfig’.
2019/12/31 15:42:48 CLSRSC-594: Executing installation step 7 of 19: ‘SetupLocalGPNP’.
2019/12/31 15:42:53 CLSRSC-594: Executing installation step 8 of 19: ‘CreateRootCert’.
2019/12/31 15:42:53 CLSRSC-594: Executing installation step 9 of 19: ‘ConfigOLR’.
2019/12/31 15:43:19 CLSRSC-594: Executing installation step 10 of 19: ‘ConfigCHMOS’.
2019/12/31 15:43:20 CLSRSC-594: Executing installation step 11 of 19: ‘CreateOHASD’.
2019/12/31 15:43:25 CLSRSC-594: Executing installation step 12 of 19: ‘ConfigOHASD’.
2019/12/31 15:43:25 CLSRSC-330: Adding Clusterware entries to file ‘oracle-ohasd.service’
2019/12/31 15:44:10 CLSRSC-4002: Successfully installed Oracle Trace File Analyzer (TFA) Collector.
2019/12/31 15:48:30 CLSRSC-594: Executing installation step 13 of 19: ‘InstallAFD’.
2019/12/31 15:48:34 CLSRSC-594: Executing installation step 14 of 19: ‘InstallACFS’.
2019/12/31 15:50:39 CLSRSC-594: Executing installation step 15 of 19: ‘InstallKA’.
2019/12/31 15:50:43 CLSRSC-594: Executing installation step 16 of 19: ‘InitConfig’.
2019/12/31 15:51:37 CLSRSC-594: Executing installation step 17 of 19: ‘StartCluster’.
2019/12/31 15:53:16 CLSRSC-343: Successfully started Oracle Clusterware stack
2019/12/31 15:53:16 CLSRSC-594: Executing installation step 18 of 19: ‘ConfigNode’.
2019/12/31 15:54:16 CLSRSC-594: Executing installation step 19 of 19: ‘PostConfig’.
2019/12/31 15:55:00 CLSRSC-325: Configure Oracle Grid Infrastructure for a Cluster … succeeded
Khi chạy hết cript, quay lại màn hình Execute Configuration Scripts và ấn nút OK.

Việc cài đặt Grid đã hoàn thành. Bỏ qua lỗi liên quan đến NTP.

9. Cài đặt và cấu hình Oracle Database 19c Software
[oracle@dbwr1]$ . db.env
[oracle@dbwr1 dbhome_1]$ unzip LINUX.X64_193000_db_home.zip
[oracle@dbwr1 dbhome_1]$ ./runInstaller
Launching Oracle Database Setup Wizard…
Chọn “Setup software only” → Next

Chọn “Oracle Real Application Clusters database installation” → Next

Chọn cả 2 node → Next

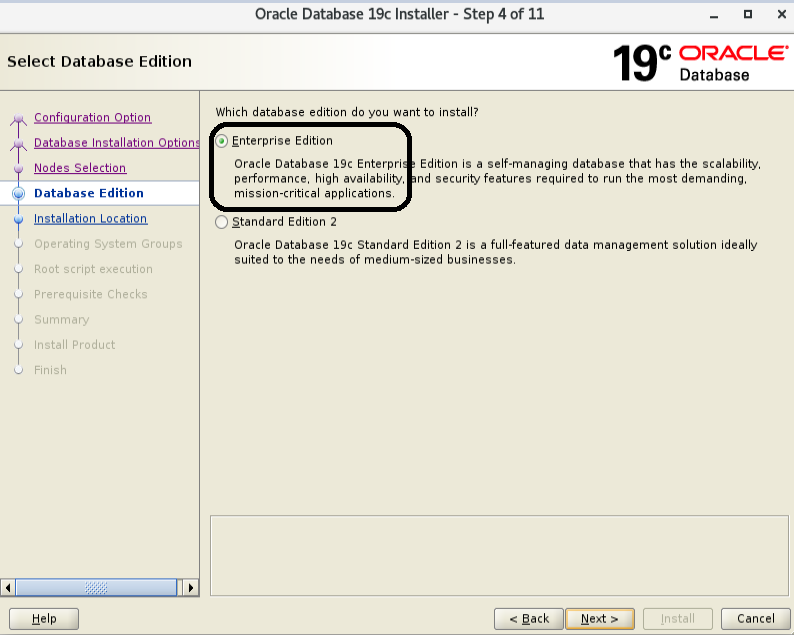
Chọn bản “Enterprise Edition” → Next
Đảm bảo Oracle base là /u01/app/oracle và Oracle Home là /u01/app/oracle/product/19c/dbhome_1 → Next

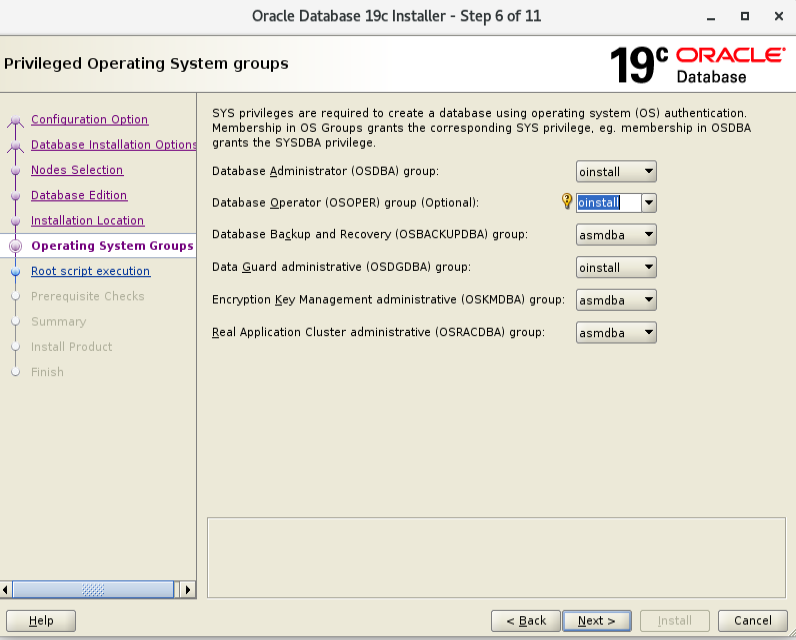
Chọn hết group là oinstall → Next (bỏ qua mọi cảnh báo)
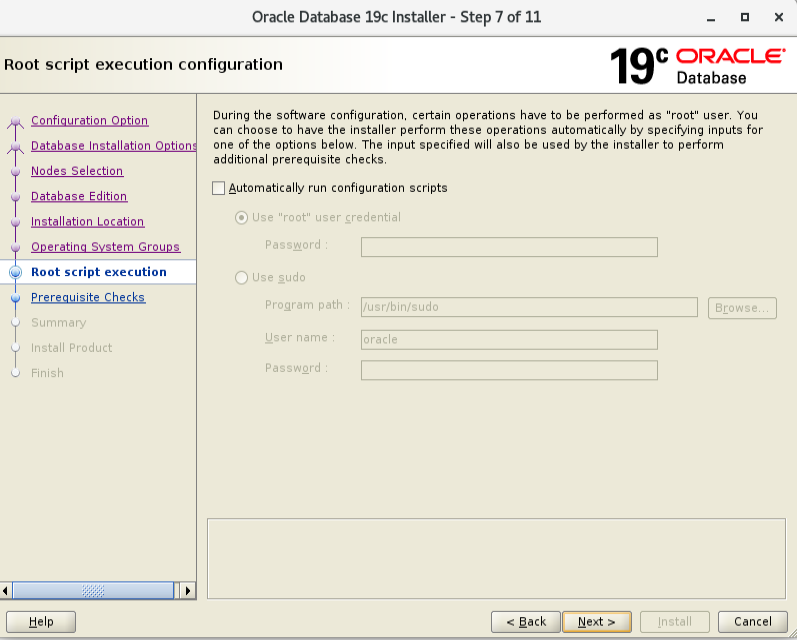
Click nút Next
Chọn vào “Ignore All” → Next

Click vào nút Install

Khi xuất hiện hộp thoại, chạy script trên mỗi node bằng user root. Sau khi chạy xong ấn OK

Node 1
[root@dbwr1 dbhome_1]# /u01/app/oracle/product/19c/dbhome_1/root.sh
Performing root user operation.
The following environment variables are set as:
ORACLE_OWNER= oracle
ORACLE_HOME= /u01/app/oracle/product/19c/dbhome_1
Enter the full pathname of the local bin directory: [/usr/local/bin]:
The contents of “dbhome” have not changed. No need to overwrite.
The contents of “oraenv” have not changed. No need to overwrite.
The contents of “coraenv” have not changed. No need to overwrite.
Entries will be added to the /etc/oratab file as needed by
Database Configuration Assistant when a database is created
Finished running generic part of root script.
Now product-specific root actions will be performed.
Node 2
[root@dbwr2 dbhome_1]# /u01/app/oracle/product/19c/dbhome_1/root.sh
Performing root user operation.
The following environment variables are set as:
ORACLE_OWNER= oracle
ORACLE_HOME= /u01/app/oracle/product/19c/dbhome_1
Enter the full pathname of the local bin directory: [/usr/local/bin]:
The contents of “dbhome” have not changed. No need to overwrite.
The contents of “oraenv” have not changed. No need to overwrite.
The contents of “coraenv” have not changed. No need to overwrite.
Entries will be added to the /etc/oratab file as needed by
Database Configuration Assistant when a database is created
Finished running generic part of root script.
Now product-specific root actions will be performed.
Cài đặt Oracle Database 19c hoàn thành.

Tạo ASM Diskgroup sử dụng công cụ ASMCA Tool
[oracle@dbwr1 ~]$ . grid.env
[oracle@dbwr1 ~]$ asmca
Chọn đĩa cho diskgroup DATA

Đặt redundancy là External, chọn đĩa 35GB cho diskgroup DATA sau đó ấn nút OK

DiskGroup sắn sàng tạo Database

Database Creation
[oracle@dbwr1 ~]$ . db.env
[oracle@dbwr1 ~]$ dbca
Chọn Create Database -> Next

Chọn “Advanced configuration” → Next

Chọnthe “General purpose or Transaction Processing” → Next

Chọn cả 2 node → Next

Gõ Database Name và không chọn vào “Create as Container database” (bạn có thể tạo PDB tùy bạn)

Default select as it is and Click next
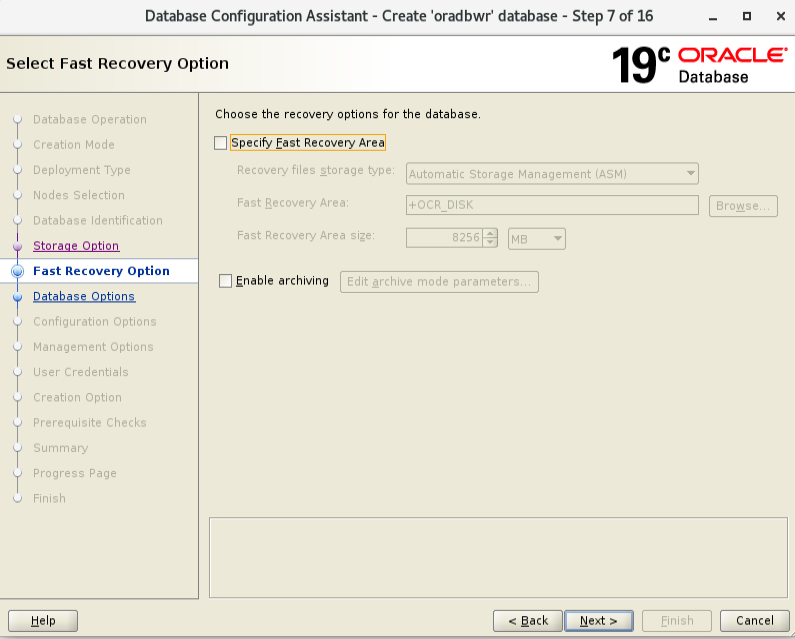
Không chọn vào FRA and Archivelog mode (môi trường Product chọn vào FRA và archiedlog mode)
Không chọn gì → Next

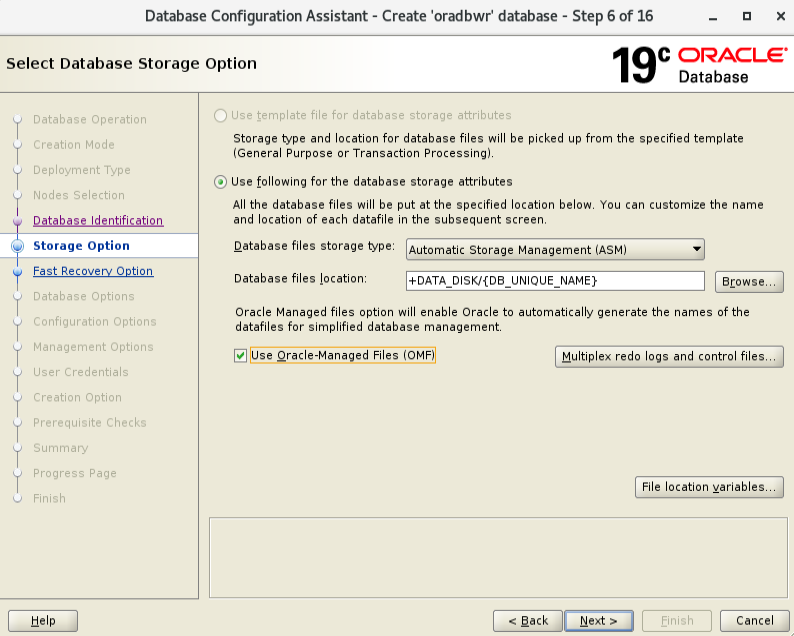
Chọn ASMM:

Không chọn gì (để Default) → Next

Thêm vào mật khẩu oracle → Next

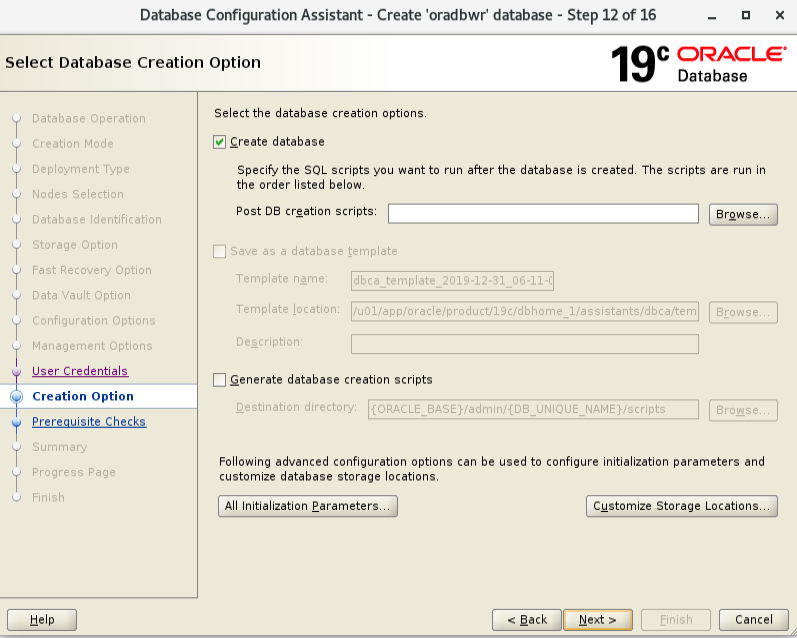
Chọn “Create Database” → Finish

Oracle 19c Rac Database được tạo.

10. Kiểm tra sau khi cài RAC
Kiểm tra các dịch vụ của Grid Infrastructure:
[oracle@dbwr1 ~]$ crsctl status resource -t
[oracle@dbwr2 ~]$ crsctl status resource -t
Kiểm tra trạng thái Database RAC
[oracle@dbwr1 ~]$ srvctl config database -d oradbwr
Database unique name: oradbwr
Database name: oradbwr
Oracle home: /u01/app/oracle/product/19c/dbhome_1
Oracle user: oracle
Spfile: +DATA_DISK/ORADBWR/PARAMETERFILE/spfile.268.1028487843
Password file: +DATA_DISK/ORADBWR/PASSWORD/pwdoradbwr.256.1028485849
Domain:
Start options: open
Stop options: immediate
Database role: PRIMARY
Management policy: AUTOMATIC
Server pools:
Disk Groups: DATA_DISK
Mount point paths:
Services:
Type: RAC
Start concurrency:
Stop concurrency:
OSDBA group: oinstall
OSOPER group: oinstall
Database instances: oradbwr1,oradbwr2
Configured nodes: dbwr1,dbwr2
CSS critical: no
CPU count: 0
Memory target: 0
Maximum memory: 0
Default network number for database services:
Database is administrator managed
Kiểm tra mức Database
[oracle@dbwr1 ~]$ sqlplus / as sysdba
SQL*Plus: Release 19.0.0.0.0 – Production on Tue Dec 31 19:20:07 2019
Version 19.3.0.0.0
Copyright (c) 1982, 2019, Oracle. All rights reserved.
Connected to:
Oracle Database 19c Enterprise Edition Release 19.0.0.0.0 – Production
Version 19.3.0.0.0
SQL> select INST_NUMBER,INST_NAME FROM v$active_instances;
INST_NUMBER INST_NAME
———– ———————————-
1 dbwr1.localdomain:oradbwr1
2 dbwr2.localdomain:oradbwr2
SQL> SELECT instance_name, host_name FROM gv$instance;
INSTANCE_NAME HOST_NAME
—————- —————————————————————-
oradbwr1 dbwr1.localdomain
oradbwr2 dbwr2.localdomain
Stop Grid Infrastructure
Tắt instance trên mỗi node:
SQL> shutdown immediate
Vào user root
# cd /u01/app/19c/grid/bin
#./crsctl stop crs -f
Start Grid Infrastructure
Vào user root
# cd /u01/app/19c/grid/bin
#./crsctl start crs
Kiểm tra các dịch vụ của Grid Infrastructure:
[oracle@dbwr1 ~]$ crsctl status resource -t
[oracle@dbwr2 ~]$ crsctl status resource -t
THAM KHẢO THÊM
Mở LAB dựng sẵn Oracle Database RAC 12.2 trên Oracle Linux (chỉ cần OPEN là xong)
Cài đặt Oracle Database 11gR2 RAC trên Oracle Linux 6.3 sử dụng VirtualBox
[VVIP5] Cài đặt Oracle RAC 11.2.0.4 + Patch đầy đủ trên Production
Cài đặt Oracle RAC 11gR2 trên AIX
Cài đặt Oracle Grid Infrastructure (Clusterware, ASM) 11g trên Solaris trên VMWare Workstation
* KHOÁ HỌC ORACLE DATABASE A-Z ENTERPRISE trực tiếp từ tôi giúp bạn bước đầu trở thành những chuyên gia DBA, đủ kinh nghiệm đi thi chứng chỉ OA/OCP, đặc biệt là rất nhiều kinh nghiệm, bí kíp thực chiến trên các hệ thống Core tại VN chỉ sau 1 khoá học.
* CÁCH ĐĂNG KÝ: Gõ (.) hoặc để lại số điện thoại hoặc inbox https://m.me/tranvanbinh.vn hoặc Hotline/Zalo 090.29.12.888
* Chi tiết tham khảo:
https://bit.ly/oaz_w
=============================
KẾT NỐI VỚI CHUYÊN GIA TRẦN VĂN BÌNH:
📧 Mail: binhoracle@gmail.com
☎️ Mobile: 0902912888
⚡️ Skype: tranbinh48ca
👨 Facebook: https://www.facebook.com/BinhOracleMaster
👨 Inbox Messenger: https://m.me/101036604657441 (profile)
👨 Fanpage: https://www.facebook.com/tranvanbinh.vn
👨 Inbox Fanpage: https://m.me/tranvanbinh.vn
👨👩 Group FB: https://www.facebook.com/groups/DBAVietNam
👨 Website: https://www.tranvanbinh.vn
👨 Blogger: https://tranvanbinhmaster.blogspot.com
🎬 Youtube: http://bit.ly/ytb_binhoraclemaster
👨 Tiktok: https://www.tiktok.com/@binhoraclemaster?lang=vi
👨 Linkin: https://www.linkedin.com/in/binhoracle
👨 Twitter: https://twitter.com/binhoracle
👨 Địa chỉ: Tòa nhà Sun Square - 21 Lê Đức Thọ - Phường Mỹ Đình 1 - Quận Nam Từ Liêm - TP.Hà Nội
=============================
học oracle database, Tự học Oracle, Tài liệu Oracle 12c tiếng Việt, Hướng dẫn sử dụng Oracle Database, Oracle SQL cơ bản, Oracle SQL là gì, Khóa học Oracle Hà Nội, Học chứng chỉ Oracle ở đầu, Khóa học Oracle online,khóa học pl/sql, học dba, học dba ở việt nam, khóa học dba, khóa học dba sql, tài liệu học dba oracle, Khóa học Oracle online, học oracle sql, học oracle ở đâu tphcm, học oracle bắt đầu từ đâu, học oracle ở hà nội, oracle database tutorial, oracle database 12c, oracle database là gì, oracle database 11g, oracle download, oracle database 19c, oracle dba tutorial, oracle tunning, sql tunning , oracle 12c, oracle multitenant, Container Databases (CDB), Pluggable Databases (PDB), oracle cloud, oracle security, oracle fga, audit_trail, oracle dataguard, oracle goldengate, mview, oracle exadata, oracle oca, oracle ocp, oracle ocm , oracle weblogic, middleware, hoc solaris, hoc linux, hoc aix, unix, securecrt, xshell, mobaxterm, putty


